

Start Creating Content with WordPress (Webinar Q&A)

start creating content with wordpress

We recently hosted a webinar on how to create content online with WordPress. The session is the second one in a series of walkthroughs aimed at helping content creators and website aspirants build or improve their online presence.

The webinar recording is available on our official YouTube channel for those interested in getting started with a WordPress website, or brushing up on their knowledge:

We also got a great deal of interesting questions which we didn’t have the time to address during the webinar, so we’ve provided the answers in the blog post below.

First Steps in WordPress Site Management

How do you customize my URL, so it just has my own domain and doesn’t include “wordpress”?

It seems that you are hosting on WordPress.com and using a free wordpress.com domain name, hence the wordpress keyword in your domain name. You should be able to purchase a custom domain and change it from your WordPress.com control panel.

If you move to a paid hosting provider such as SiteGround, you can register any domain name you wish as long as it’s not taken by someone else, and easily set your site to be accessible by that domain.

The key factor here is that the SiteGround.com portal and the Admin panel of your website are two different areas. By accessing your SiteGround Client Area, you can manage all your sites and payments, and access site-specific tools such as backups, emails, etc. The wp-admin page will lead you to log into your WordPress Admin panel to edit and customize the content of a specific site. To access your SiteGround Client Area, you need to go to login.siteground.com and type your SiteGround username and password. They may be different from the ones you use for accessing your WordPress Admin, so if the system does not accept them, you can use the Login recovery option available on screen.

How do I go about adding a new site to my plan on SiteGround? When is it advisable to have multiple sites? 

All hosting plans we offer, except for the StartUp package, allow you to create and manage multiple websites. To create another site under your account, simply access your Client Area > Websites > Add new and go through our Website Setup Wizard. It takes just a few minutes to spin off new sites using the wizard and we have depicted the whole process in these guides.

It’s advisable to create an additional website in case you have a plan of what you want to use it for and, of course, time, as you will need some extra effort to develop and maintain the site. If you want to write on a totally different topic or start a completely new project, then it’s a good idea to create a new site for it.

Customizing your WordPress Site

Can I publish/display a “coming soon”/”under construction” page as the Home page while I work on my website in private?

In case you haven’t started your site yet, you can always create it on a temporary url provided by SiteGround which is not indexable by search engines (so random people on the web can’t find it accidentally) and later change it to your real domain name. By doing this, you won’t have to worry about installing additional plugins or doing additional configuration.

If you already created your site, one of the easiest ways to create a “Coming soon”, “Under Maintenance” or similar landing page is by using a plugin. It will allow you to design the page using a template and show it to your regular site visitors, while you will be able to access your dashboard and work on your site as usual. Once you’re ready to go live, you can easily disable the page and show the expected content. There are multiple Maintenance plugins available for free in the WordPress repository and one of the best documented is SeedProd.

You can read about alternative ways of hiding your site in our article on how to limit access to website during development.

If I have some pages that I only want subscribers to see, how do I control the login process?

Depending on your final objective, you have a couple of options.

The simplest way that does not require any plugins or whatsoever is to set your desired pages to require username and password to be accessed. This way only website users who have the necessary credentials may be able to view the content on the page. You can password protect your pages from the native WordPress Password Protected option described in our tutorial on adding pages to WordPress. Among the downsides is that there is no automation, in other words you will have to provide the credentials manually to each user.

If you are looking for more robust options for turning WordPress into a community site, you can install a Membership plugin. It comes with elaborate options that you can set to your preference, including enhancing the registration process and personalizing the login screen and dashboard. One of these plugins is BuddyPress and you may read more about it in our tutorial.

How can we add more themes to WordPress?

Additional themes can be installed from the WordPress Admin panel > Appearance > Themes > Add New. You can check our tutorial for step-by-step instructions or watch the webinar from this moment, if you prefer to see the steps.

If we change themes and there are some leftover images and text of the first theme, how can we remove them and troubleshoot this issue?

This looks like a development question, related to the specific site setup, but generally changing your theme should not affect your image and text content because the latter is added by you, while the theme is only responsible for the overall appearance of your site.

If you are referring to demo/imported content from the previous theme that you don’t need, you can either delete it manually from your posts/pages/media library or if you want to start literally from scratch,  you can delete WordPress, reinstall it from Site Tools and apply the new theme.

Can I embed code from another site for my contact form?

You can copy and embed code from a different site into WordPress, but this usually requires advanced coding skills to configure properly. Most of the time, it’ll be easier to check if the other site offers a plugin for better integration. 

Should I ask for the contact plugin from the email provider I will use?

The actual contact form setup depends on the email provider you’ve chosen. If you are using a business email provider (SiteGround offers business email service on all hosting plans at no additional cost), it’s likely that they do not offer a contact form plugin as it’s not within their scope. This is the more common scenario and what you can do is download and use a free third-party contact form plugin from the WordPress repository and set it up with your business email address. The one that we recommended during the webinar was WPForms and it has detailed instructions on how to create a contact form and add it to a page.

On the other hand, there are email marketing platforms that come with a greater toolkit for managing emails, but usually have a corresponding cost. If you’re using such a service, then it probably offers a plugin that lets you easily integrate the contact form you create on its platform with your own site. You would find information about their plugin, instructions on how to use and get support directly on their website.

Do you recommend using Divi/Elementor? If so, could you do one of these workshops on how to best use it?

With WordPress, you get a built-in block editor that is capable of both formatting and editing content, and our Start creating content with WordPress webinar covers exactly that. Divi and Elementor are addons that work on top of this native framework with some caveats among which is the fact that each comes with its own learning curve, which will require additional time and effort to master. Certainly, you can use them, but it’s best to get a better understanding of the basic WordPress framework before using any addons, partly because these addons largely revolve around it as well.

Check out our YouTube channel for an introductory webinar on Divi.

When Your WordPress Site is Ready to Go Live

Is the HTTPS protocol enabled automatically for WordPress websites?

Securing your website with HTTPS protocol is essential. We install an SSL certificate automatically for free on all new websites as long as the website is resolving from our servers. WordPress requires an additional step required before your site loads with HTTPS – to reconfigure your urls and enforce the HTTPS protocol.

We do not automate this, as it is a webmaster decision that we cannot make on behalf of the owner of the site, but we have developed a tool that allows you to do it instantly. If you are already using the SiteGround Optimizer plugin, access its Settings > Environment settings > HTTPS Enforce. In rare occasions, some of your site elements (most often images) may still load with http leading to the so-called mixed content issue. If this happens and your site does not appear as fully secure, toggle also the Fix Insecure Content option. More details can be found in our article.

How do I connect Google Search Console to my site?

To add your site to Google, you will need to verify that you are its owner. This can be done in several ways, but one of the easiest methods, if you are a SiteGround customer, is to create a TXT record in your Site Tools DNS Zone Editor. You’ll be able to get the TXT record during the setup. 

Head to the Google Search Console website to get started and check out their official guide for step-by-step instructions.

Will you be doing a webinar on e-commerce on your site?

We’re passionate about eCommerce and we’re definitely considering it. Meanwhile, you may want to check out some of our previous webinars on using WordPress as an eCommerce tool, such as our step-by-step walkthrough on setting up WordPress as a store with WooCommerce.

[subscribe_cta]
Build in Security from Day 1 to Prevent Website Hacks

website hacks prevention

Website security should be on the mind of every site owner. It doesn’t matter if your site is large or small – if it is important to your business, you need to keep it safe and secure. As a site owner myself – and primarily a WordPress site owner – I’ve come up with a checklist I go through every time I spin up a new website for myself or a client. Let me share it with you in hopes that you will pick up a few new ideas. Let’s look at what it takes to secure a website.

Choosing A Secure Web Host

It should go without saying, but security starts with your web hosting company. I’ve used everything from ‘do it yourself web hosting’ to ‘concierge level hosting’. The trick is to find the level you need and the support you are comfortable with.

Check their support

The first thing I do when considering a new web host is to check their support and response time. I’ll sign up for a free trial, put up a site, and then ping support to ask a question. How quickly they respond and how well they understand the question gives me clues as to what I can expect from them if I host with them.

Check their security features

I’ll then check their website and hosting plans to see what security tools and features they provide. I’ll look for essential things like an SSL certificate to encrypt and protect my website data, domain privacy to hide my personal information from public Whois databases, 2-factor authentication to protect my website from unauthorized access, geographically distributed backups to have a safe copy of my website in case something goes wrong.

Other key security measures I’d like my website hosting provider to have in place is a Web Application Firewall – software that sits in front of my website and protects it from known bad traffic – to keep my host server safe from software exploits, DDOS and brute-force attacks protection, and the option for automatic updates to the latest PHP and WordPress versions to keep your site secure from malware.


If the host provides yet more security tools, that would be even better. For example, on top of all these features, available on the SiteGround platform, they also offer an in-house developed Site Scanner service and a free in-house built SiteGround WordPress Security plugin to make sure that your website would be as secure as possible.

Check their blog

Step 3 when selecting a web host is always to read the last 5 entries in their blog. 

  • Are they recent?
  • Do they talk about security?
  • Do the blog posts seem helpful?

No, not all blog posts are going to be about security, but I’d better be able to find a recent one. The Security landscape changes quickly so they need to be posting regularly.

Check their price

Finally, I check their pricing tiers and figure out where my site will fall. Price is the last thing I check because if the first two boxes aren’t checked then the price doesn’t matter. They could be giving it away for free and I wouldn’t use them.

Build Your Site Securely From The Beginning

Once you’ve laid a secure foundation for your website, it’s time to start framing it and building it out. At every step, you need to make sure that security is “baked in” not “bolted on”.

Security is baked in when you think about it before you start building your website

Security is bolted on when you build out your entire website and then decide to just add a security-focused plugin to cover your bases.

Baked in is always better.

What does it mean to bake in security?

Install an SSL certificate as soon as you get the website set up

Don’t wait until you are ready to deploy your website before you remember to install your SSL certificate. These days a secure website is just a few clicks away. Take the time to do it now and then make sure you force all traffic to be https after it is installed. For those users hosting with SiteGround, your Site Tools makes setting up and enforcing SSL easy. Just a few clicks and you are in business.

Set a strong password policy before you start adding users

Passwords are the lock on the front door to your site. When building out your site, put a strong lock on the front door by requiring all users to use strong passwords. Doing this before you let users start coming into your site will make sure that no users set up weak passwords.

Require Two-Factor Authentication (2FA) for any user that will have admin-level rights in the system.

Two Factor Authentication is the deadbolt on the inner office of your site. Yes, a strong password is important for anyone to get into the site, but to get to things like financial information or user management, you want a strong deadbolt as well. Keep your system secure by implementing 2FA for all your admins. The SiteGround Security plugin makes setting up 2FA very easy.

Set up a backup system that will regularly backup your entire website and store those backups securely.

You need a 30-day backup system implemented from day 1. Not 1 day, not 7 days, 30 days. The reason is, that if your site gets hacked, you may not notice immediately. Once you do notice, you want to clean your site and one of the best ways to do that is to restore your site from a clean backup. 

SiteGround’s Site Tools provides an intuitive tool for scheduling nightly backups and restoring from them when needed. 

While we are talking about backups. Don’t forget to force a backup before any upgrade, major site redesign, or installing a new plugin. It never hurts to have a fresh backup in case things go bad.

Adhere To The Principle Of Least Privilege

Before you start letting users into your system, think about the roles that they will play. A role is a set of permissions or privileges and you want to give each user the absolute minimum level of privilege they need to use your site.

There are several good role editors for WordPress and I suggest you install one, learn how to use it, and then audit the roles you have in your site to make sure they have only those privileges they need to use your site. 

On a regular basis – at the very least once a year – review these privileges to make sure they are still valid and to make sure that no role has been granted a privilege it does not need. 

Most users are not trying to do bad things, but we have to assume they would if they could. Adhering to the Principle of Least Privilege will help make sure that bad actors, or curious users, can’t do things to your site they aren’t supposed to.

Only Use Software From A Trusted Source

In software development – as in building a house – your supplier’s reputation is critical to your project’s success. If you use a cut-rate supplier for the framing materials of your house, the entire project will suffer. Worse yet, it will cost you more later on to fix these problems than it would to just buy good materials to begin with.

Building your website with quality materials like plugins and themes from reputable vendors will usually cost you money in the short run. However, knowing that you have companies standing behind their products and updating them when issues arise is worth the money.

Yes, you can choose a free plugin or theme to build a critical feature of your website. However, what do you do if you discover that there is a security flaw? Worse yet, what do you do when you discover that flaw and then discover that the author has abandoned the project? At that point you have 2 options, neither good.

  1. Hire a developer to fix the security flaw
  2. Rip out the plugin, find another one that does the same thing, implement it and make any changes to your process that are necessary.

Both of these can be expensive propositions that could be avoided by simply choosing wisely in the beginning.

SiteGround recently looked at the data from a lot of compromised websites. What they found was that the majority of the compromised websites were compromised because they had unpatched plugins that had security flaws in them. Much of the time these were the free versions of paid plugins downloaded from untrustworthy sources. Only download plugins and themes from trusted sites like WordPress.org or vendors you trust.

The WordPress plugin repo is a reputable source. WordPress.org has implemented a review process – both human and scanning software – to help filter out plugins that have potential security issues or otherwise violate WordPress policy.

Scan Your Site Regularly

Just like you build a security system into your house, you want to set up a security scanner for your website as soon as you build it. Security scanners look at your site both internally and externally to make sure that there are no known vulnerabilities. It will check your website for viruses as well. No security scanner is perfect, just like no home security system is perfect. But your website is more secure with one.

A good scanner will look for things like cross-site scripting vulnerabilities among other things. These vulnerabilities can allow your site to be used in the attack of other sites or attacks on the end user themselves.

SiteGround has a great scanning system available. I get regular emails from it telling me which sites it has scanned and either that they are all clear or that there is an issue I need to address…immediately.

Once you’ve built a new house, you don’t hand out keys to anyone who asks, even if they claim to have a good reason for wanting in. Similarly, you want to make sure that if you get an email that says it is from your site, you don’t automatically click on the link.

You should know every email your system is capable of sending. When you get one that you don’t remember setting up, you need to investigate. Don’t click, start looking at it. Check the headers, look at the exact URL any links go to. Most importantly, quarantine the email using your virus detection software. 

Unknown emails purporting to come from your site are just another way that bad actors try to get into your site. These phishing attacks come from servers that are not under your control, so you can’t stop them. You can, however, be aware so that when you get them, you delete them. In almost all cases, if you don’t click, the email itself can’t do any damage.

Tools I Regularly Use To Bake Security Into My Sites

Keeping a WordPress website secure doesn’t have to be a full-time job if you bake security into it from the beginning. To do this, there are a couple of tools I use on almost every WordPress website I have.

The SiteGround Security Plugin is the first plugin I install on any new website I spin up. I install it, I install an SSL certificate, and I configure everything to be secure before I do anything else. If I get this part right, everything else is easier. 

The SiteGround Optimizer plugin is a great way to make my site faster, but it is also where I check the “HTTPS Enforce” checkbox. This way all the traffic on my site goes over HTTPS even if it wasn’t originally. Having an SSL certificate is important, enforcing it on all traffic is equally important. 

SiteGround’s Site Tools have a lot of great options to make managing a website easy. The one tool I use in setting things up though is the Backup tool. After I get SiteGround Security and SiteGround Optimizer setup and configured, I have my foundation laid – I force a backup. This is my fallback in case I mess something up while building out my site. 

Then before I install each plugin or theme, I create a new one. I name these backups “BEFORE “ + the plugin or theme name. This way I can roll back to any point in the process.

Wrap Up

If you lay a secure foundation for your website and then think about security at every turn, then you can rest easy at night, knowing that your site is as secure as possible. No website, however, is bulletproof. Therefore, the last step is to build your Disaster Recovery plan. What steps do you take when your site has been hacked?

The SiteGround Security plugin has a series of steps you can take just for that situation. It is not a complete disaster recovery plan but when you combine it with 30 days of backups, you are well on your way to having one.

[subscribe_cta]
Raising WordPress Default Memory Limit for SiteGround Clients

raising WordPress memory limit to 256 mb

At SiteGround we always strive to go the extra mile for our clients and make website management on our platform as easy and hassle-free as possible. This is especially true for WordPress websites, us being one of the first web hosts to start offering managed WordPress services to spare you tons of manual work and hassle. The extra effort we put into it goes steadily throughout the years, complemented by a strong involvement from our team in the WordPress dev and hosting projects. 


As of recently, we have been receiving a growing amount of requests from clients for an increase of the default WP memory limits – a request reinforced by a new discussion within the WordPress community about raising the default memory limit of the software, since the current values are old and no longer relevant to the present day. Being the resource efficiency geeks that we are, we decided to increase the default values at a platform level and offer a global solution for all WordPress users on our hosting.

Why is an update of the WP memory limits needed?

The WordPress ecosystem, including WordPress themes, plugins, and the software itself is constantly evolving and growing and with that, the need for more resources. WordPress site builders, online store management, e-learning management, etc. get more complex and heavier with time, and require more resources to operate properly. If you have a low memory setting, this can lead to issues with saving your page (as WordPress does not have enough Memory to save the page content to the database). This can also be a cause for critical error messages, or memory-exhausted errors on your WordPress site.

The current WordPress default memory limits are 40 МВ for WP and 64 for WPMU – while many new plugins and themes require a minimum of 128 MB of memory to run properly – and most of them recommend 256 MB, if possible. We’ve always made sure to provide plenty of hosting resources for our clients but unfortunately, the way your application default settings are set to work plays a big role into how efficiently you are using the resources we provide. For example, the current PHP Memory Limit on SiteGround servers is 768 MB, so it definitely allows a higher WP Memory limit.

Currently, if you’re using a heavier plugin, and need a higher WordPress memory limit, you have to specifically contact your hosting provider and request it, or you have to do it manually yourself. But it’s a hassle, even if you know what you’re doing. 
That’s why we decided to override the default WordPress memory settings for SiteGround clients, increasing them to 256M from the default 40 МВ for WP and 64 for WPMU. Here is how we went about it:

All new WordPress Installations on SiteGround Now Come with the Higher Memory Limit Out of the box

We started out by including a new custom config file which overrides and automatically updates the default memory limit for all our new WordPress installations through SiteGround Site Tools. That way all new WordPress instances on our servers get a head start straight from the moment of installation. Same goes for all new WordPress transfers from other hosting companies to our servers, performed with our free WordPress Auto-migrator plugin.

All Existing WP instances will be gradually updated to the new default ones

The situation with our existing WordPress clients was a bit more complicated to tackle, since we needed to be mindful that some of you may have already set a custom WordPress memory limit on your applications. So our solution will not override any custom WordPress memory limit you might have set yourself.

Since we always test, double test, and then test some more everything before going full-scale, we have decided to start gradually updating only the default WordPress memory limit server by server to monitor and perform health checks for each. 

!NB If you have installed WordPress manually in your account, and have not added it to your Site Tools, then our system has no way of knowing about you using it, and your default WordPress limit will not be updated. You will need to do that manually yourself, if needed. In any case, adding your WordPress applications is quite easy. You can do that with a few clicks from Site Tools > WordPress > Install & Manage > Add Existing Site.

That’s why we highly recommend you use our WordPress installer whenever launching new WordPress installations, or WordPress Auto-migrator when migrating an existing WordPress site to us. That way you can take full advantage of our best-in-class WordPress managed hosting services, and multiple improvements that we keep on adding.

How can you check your WordPress Memory limit?

To check the current WP memory limit of your installation you can access your WP admin backend and go to Tools –> Site Health. Then select “Info” and expand the “WordPress Constants” list. Look for WP_MEMORY_LIMIT – this is the memory limit for the website you want to check.

[subscribe_cta]

SiteGround Addresses Critical Security Vulnerability in Elementor WordPress Plugin on Day 0

The Elementor 3.6.0 version of the WordPress website builder plugin introduced a new functionality for easy plugin setup. Unfortunately a serious security vulnerability has been detected, which if exploited, allows full website access, rendering all Elementor 3.6.0 – 3.6.2 versions vulnerable. SiteGround took immediate action to protect our WordPress clients using the plugin, resulting in all instances on our servers being updated to resolve the issue on day 0 of the vulnerability report. Read on for more information on how we have protected our clients.

How severe is the vulnerability?

The issue is critical, since it allows regular website users, including subscribers, to fake an Elementor Pro .zip file, upload and activate it to a website, executing pretty much any code part of the archive. That means that if you are using Elementor version 3.6.0, 3.6.1 or 3.6.2 for your WordPress site, and user registration is enabled on it (for example WooCommerce websites, membership websites, etc.) an attacker could get full access to your site.

What did we do to protect SiteGround clients?

Due to the severity of the issue, we immediately updated all Elementor plugin instances on our hosting servers. We did that for all clients using the Elementor plugin for WordPress on SiteGround – both the free and the paid versions of the plugin – just to be on the safe side. So, if you’re a SiteGround client, your Elementor plugin version is updated to fix the vulnerability. If you have a WordPress website using the Elementor plugin hosted elsewhere, we recommend updating your plugin version immediately to avoid staying vulnerable.

[subscribe_cta]
Speed Optimizer (formerly SG Optimizer) is Now Available аnd Free for All WordPress Sites

When we started developing the SiteGround Optimizer plugin back in 2012 we wanted it to be a bridge between our services and our clients’ WordPress sites. During the years we introduced more and more features and the SiteGround Optimizer (now named Speed Optimizer) became one of the best performance optimization plugins for WordPress, based on popular ratings. And naturally, we started getting inquiries about how websites non-hosted on our platform could benefit from it. That interest gave us a push to decouple the plugin from its dependency on our infrastructure and convert it into a hosting-agnostic, completely free solution for all. We are now excited to announce that as of its latest version, the Speed Optimizer plugin can be used by any WordPress website, regardless where it’s hosted! 

Features Available on Any Hosting Platform

Making the Speed Optimizer available on other platforms wasn’t a simple task. Part of the success of the plugin is tied to the SiteGround server setup that is built with performance in mind and takes advantage of some of its unique features. To open it up, for every feature that was dependent on our platform’s services, we had to come up with a solution that would work just as effectively on different platforms and configurations. 

File-based Caching (NEW FEATURE)

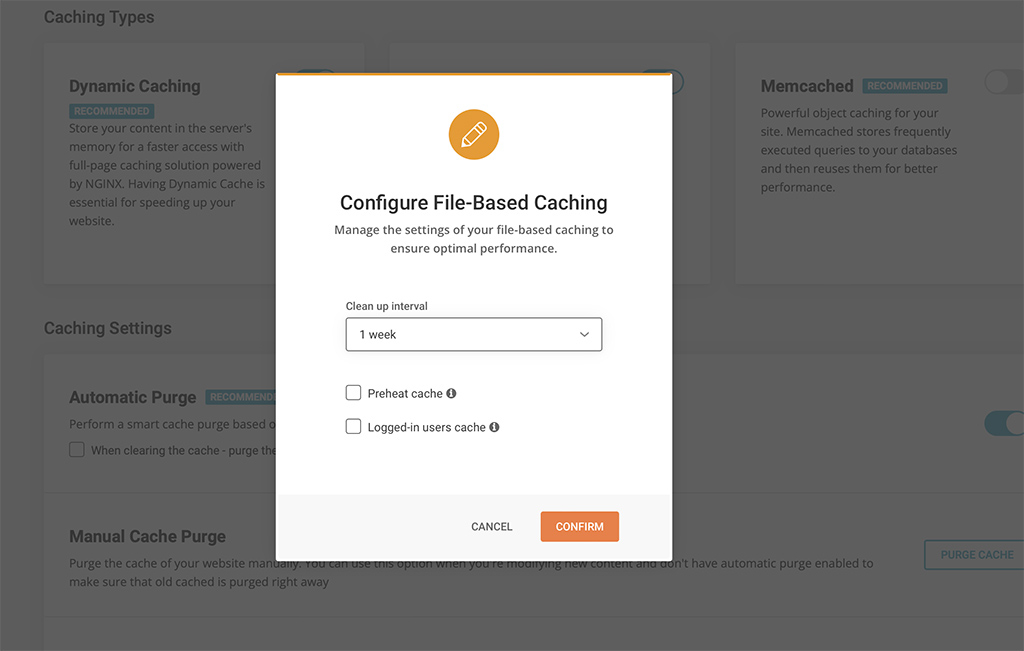
File-based Caching introduces preheating and cache for logged-in users!

Nowadays caching is one of the most effective means to optimize performance. When looking for alternatives to Dynamic Caching (built-in feature for all SiteGround websites) we decided to implement File-based caching because of its versatility and compatibility with different hosting configurations. File-based Caching can be used on its own on websites hosted outside SiteGround or as an additional caching layer for SiteGround customers who already have Dynamic Caching and Object caching (Memcached) enabled. 

Some great features of the File-based caching are the ability to keep cache for logged in users, pre-heating cache (especially useful for rarely opened pages that are opened for the first time in a while) and defining longer cache expiration. These options are configurable in the plugin interface. Although file-based caching alone is generally slower than the Dynamic caching, our tests show that its implementation in Speed Optimizer is still up to 20% faster than any other plugin that provide similar performance-optimization functionality that we have tested.

Environment Optimizations

All users can enjoy several types of environment optimizations that will tidy up your WordPress environment to achieve top performance. Here you can find features like WordPress Heartbeat Optimization where you can define how the WordPress API interacts with your application to optimize resource usage, and  Schedule Weekly Database Maintenance to make sure that your WordPress remains tidy and uncluttered.

Frontend Optimizations

The website’s front-end code can often be heavy and significantly reduce loading speed. There are several features in the Speed Optimizer that can optimize it and as a result speed up your website. Minifying your HTML, CSS and JavaScript output will decrease the size and number of server requests related to these types of files and as a result decrease loading time. We have made these functionalities available through simple toggles in the plugin. You can specify which types of files you want to minify, combine and even exclude from minification or combination. And if all of this sounds too technical for you, you can just look for the “Recommended” labels next to each option to figure out what would have the greatest impact on your website’s performance.

Media Optimizations

There are several media optimization tools in the Speed Optimizer that will work on all hosting platforms. You can enable Lazy Load with which only the media in the visible part of the browser will be loaded. This makes loading faster and smoother for longer pages with multiple media items. You can also define the Maximum Image Width allowed for images on your website. A lot of themes and plugins tend to upload excessively large images that slow loading speed without ever being displayed in their full width. 

SiteGround Exclusive Features

As mentioned earlier, our platform has some unique speed settings and services, which cannot be replaced with plugin functionality alone since they need the specific server environment to run as designed. These remain exclusively available to websites hosted on SiteGround. 

Dynamic Caching and Object Caching 

One of the best speed-enhancing features you can get for your website and our top choice when we talk about speed, is the Dynamic Caching. The Dynamic Caching is part of our proprietary 3-level server caching implementation that relies on NGINX Direct Delivery for static cache handling, Dynamic Cache for dynamic content and Object Caching (Memcached) for storing data and objects in the RAM. We believe that Dynamic Caching is essential for every website and we have it included in all of our hosting plans. From the Speed Optimizer plugin you have control over advanced WordPress-specific settings for the Dynamic Cache and Memcached to get the most of this technology. 

Image compression and WebP

The Image Compression and WebP features of the Speed Optimizer plugin are two essential features available to websites on the SiteGround platform exclusively. With our image compression algorithm you can decrease your image size (and respectively the time it takes for your images to load) by up to 85%, while keeping the image quality high for your visitors. You can also enable WebP which will convert your images to a WebP format which adds an additional reduction in size without affecting image quality. 

Opening the plugin to websites hosted outside of SiteGround was a big step for us. After running multiple tests on different hosting platforms and benchmarking performance against WordPress plugins with similar functionalities, we’re confident that the Speed Optimizer plugin is the best performance optimization tool you can get for your website regardless where it’s hosted. And it’s completely free. Download it here, try it yourself and let us know how it works for you by leaving a comment in the section below.

[subscribe_cta]

Starting 2022 with 98% Client Satisfaction Rate

Client survey results 2021

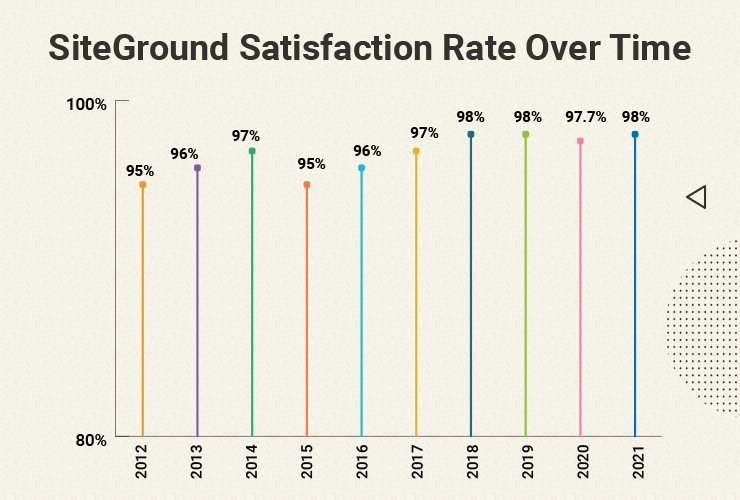
At the end of every year, we turn to our clients for the most important mark that really matters – how you rate our efforts and services throughout the year in our traditional client satisfaction survey. Each year we are amazed and humbled by the positive feedback we receive, and every time we manage to raise the bar a tad higher. In 2021, the result is a stellar 98% overall client satisfaction rating, which is spectacular in any type of client service business, but especially so in the website hosting industry. 

Of course it’s hard to put a number to satisfaction, but it’s a pointer that takes into account your ratings of the main pillars of our web hosting services – website speed, security and support, which we keep strengthening and improving on year after year. Here is a breakdown of some of the things we did in these key directions and the impact that they had on your websites, leading up to such staggering satisfaction numbers in all aspects of our service.

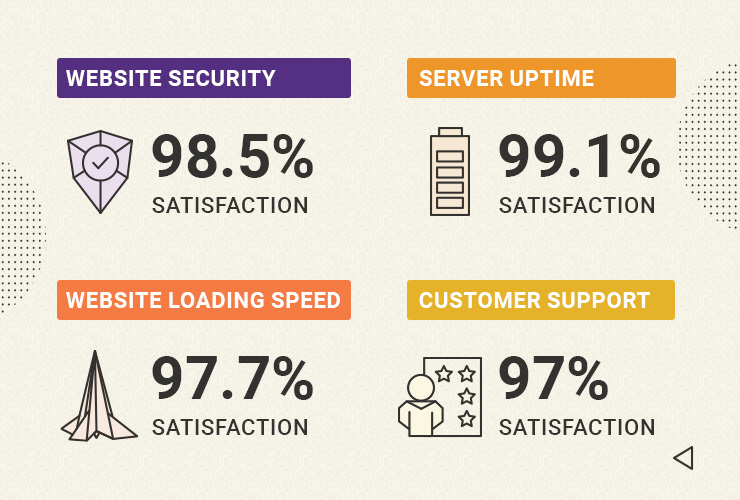
97.7% Client Satisfaction with Website Speed 

We’ve always been famous for proactively adopting the latest web speed technologies for the benefit of our clients. In 2021 we again introduced multiple new website performance enhancements at no extra cost. We started off by enabling Google’s state-of-the art Brotli image compression algorithm on our servers, ensuring between 15% to 20% website speed gains for clients right out of the box. To add to that, our new MySQL setup allowed websites hosted with us to serve more visitors simultaneously, lowering the number of slow website queries between 10x to 20x times. And by enabling our unique Dynamic caching by default on all hosting plans, clients now enjoy up to 5x times faster page loading time. These are just some of the latest and major improvements we introduced to make your websites run faster, improve your website’s user experience, conversions, and SEO rankings. In return you rated our website speed efforts with the highest marks in the history of our end-of-year client survey – a stellar 97.7% Website Speed Satisfaction Rate!

98.5% Client Satisfaction with Website Security

Parallel to our website speed improvements, we’re always working on new ways to help you with the never-ending quest of securing your website. Our mission to provide the best data protection took another big step this year with the launch of our off-site backups. Apart from our free daily backups and easy restore, we deployed a geo-redundant backup system which minimizes the risk of data loss in case a whole data center facility is in jeopardy for whatever reason. That way we ensure a safe recovery of your site with minimum downtime. In addition to that, our SiteGround Site Scanner security service got improved to include a new scanning method that allows users to run a thorough file scan of their site directly on the host server with a single click. And we also introduced our new centralized DNS for faster, safer, and easier hosting. 

4.3/5 Stars for our Client Tools and Services

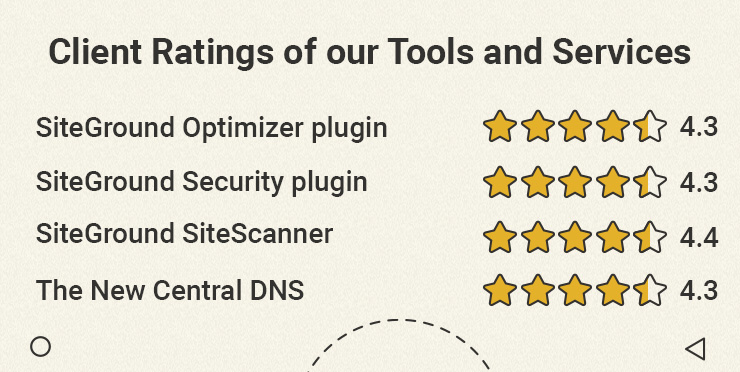
This year was especially rich in new website tools and services for our WordPress users. We launched the SiteGround Security plugin for WordPress – a free tool that greatly improves WordPress security in just a few clicks. And it’s available for everyone, not just SiteGround clients. Just a few months after its release, the plugin was awarded Silver for Best WordPress Security Plugin in the biggest WordPress community award, Monster’s Award. And to round off our list with added-valued services and tools, we released a new version of our SiteGround Optimizer WordPress plugin to upgrade its functionality and add new features for even more site speed and convenience for webmasters. All of these efforts did not go unnoticed, and we got an average rating of 4.3 out of 5 stars for each of our latest tool releases.

  • SiteGround Optimizer WP plugin → 4.3/5 rating
  • SiteGround WP Security plugin → 4.3/5 rating
  • SiteGround Site Scanner → 4.4/5 rating
  • The New Central DNS → 4.3/5 rating

A Look Back and a Look Ahead

We’ve been doing our client end-of-year survey for 10 years now, the first one dating back to 2012. A decade later, with over 2,800,000 hosted domains, your feedback ratings still manage to go up – starting from 95% overall client satisfaction, up to а steady 98% in the last couple of years.

We are thankful for your feedback and for helping us improve our services year after year. In 2022 we will continue to improve our tools and services and launch new ones for existing and potential clients alike, and hopefully manage to further exceed your expectations yet again.

[subscribe_cta]

All in One SEO Forced Update due to Severe Security Issue

A serious security issue was found in All In One SEO Plugin, affecting all versions between 4.0.0 and 4.1.5.2. The vulnerability is of the Privilege Escalation type, meaning that authenticated users with minimal rights can execute actions that are above their access level.

Due to the type of the exploit and its severity, we have decided to forcefully update all affected versions of this plugin hosted on SiteGround servers to 4.1.5.3 which fixes the problem. We do not expect any negative effects on the plugin functionality or your site performance. However, don’t hesitate to contact our support team if you notice an issue that might be related to this update.

[subscribe_cta]

PublishPress Capabilities Forced Update due to Serious Security Vulnerability

A couple of days ago a serious security issue with the PublishPress Capabilities plugin was discovered. Usually, we always try to protect our customers using our powerful WAF (Web Application Firewall) system and build rules to stop hacking attempts while leaving the update itself to the client’s preferences.

However, due to the nature of the exploit, we couldn’t protect our clients’ sites with WAF rules so, we decided to perform an emergency update on all our active installations of the plugin. Although, we do not expect any problems associated with this update (even the default WordPress system issued an update), if you notice something not working properly, feel free to contact the PublishPress Support for additional assistance!

Who’s Affected?

Only plugin versions between 2.0.0 and 2.3.0 are affected by this vulnerability. That’s why our team has performed the update only on them in order to avoid any problems with the plugin’s normal operation.

UPDATE

PublishPress Capabilities plugin has been successfully updated on our servers. As the vulnerability was reported to affect a few other plugins and themes we have gone deeper with the investigation of the issues and have managed to create a WAF rule that is protecting against possible exploits of this particular vulnerability.

[subscribe_cta]

All You Need to Know On WordPress User Roles And Capabilities To Manage Them Wisely

As WordPress has grown in popularity, application, and complexity, we have all discovered something very important, making everyone an administrator isn’t a winning strategy. Thankfully WordPress provides us with a very powerful tool called User Roles and Capabilities that helps us give people just the capabilities they need without giving them too much or too little. This helps us keep our sites secure. 

In this article we will talk about:

What Are WordPress User Roles

As sites become bigger and more complex it takes more people to manage and maintain them. 

Yes, sites still need:

  • Authors to write new content that makes people’s lives better.
  • Editors to fix all the mistakes in the authors contents
  • Administrators to keep everything upgraded and working smoothly
  • Contributors to assist editors in editing posts
  • Subscribers who may or may not have paid us money but they have at least registered with us and given us an email address. (that’s worth something right there)

But these days sites also need:

  • Warehouse staff to log in, print labels, and ship products.
  • Accounting staff to make sure we collect all the money that is owed to us.
  • Social Media managers who can see behind the scenes, but not necessarily change things.
  • Community Members who have paid a premium subscription to access the really good stuff the authors are writing and editors are editing
  • And of course…premium community members who can log in and access the really REALLY good stuff we save for those special few who see our vision and subscribe at the premium level.

The list of needed WordPress user roles is endless. It changes with every site because each site’s needs are different.

The Main Types of WordPress User Roles And Their Capabilities

A WordPress User Role is a collection of capabilities. A capability is a permission to do something. The standard WordPress install comes with around 40 capabilities, as well as with 6 user roles by default, ordered by level of power over those capabilities:

Administrator:

The default administrator role (not to be confused with the administrator account…that you should not have on your site. If you do have one, stop and watch this video) has all of the standard capabilities.

What can a WordPress administrator do?

In a regular WordPress site, there is nothing that the administrator role cannot do, such as:

  • Create or delete users & manage their permissions
  • Customize WP dashboard
  • Update the WP core, themes and plugins
  • Edit and manage posts and categories
  • Upload files
  • Moderate comments
  • …and a lot more.
Who should get the Administrator role?

The administrator role should be reserved for the person that is responsible for the technical aspects of the site. If you don’t manage the security of the site, update plugins, and handle problems, you probably don’t need to be an administrator.

For safety sake, I always create a separate account that I use on my sites as the administrator. My normal account – the one I use to post content and manage users –  is an editor. Therefore, I have to make a conscious decision to log in to do administrator things. 

My administrator level accounts all have Two Factor Authentication enabled (see below) and have very strong passwords.

Things get a little more complicated if you are running a WordPress Multisite, because the admins user capabilities are limited for these types of sites. For this, there is a bonus WordPress user role in WordPress, the Super-Admin role.

Editor:

The editor manages things. The account I normally log into my sites with is an editor. I can do everything except manage plugins, themes, and other technical things that require some serious thought before doing. Having my day-to-day account be an editor keeps me from accidentally disabling or deleting a plugin or theme.

Who should get the Editor role?

Anyone who is managing things on your site (content, users, etc.) is a candidate for being an editor

Don’t be fooled by the role name, editor is still a very powerful role and in the wrong hands can cause serious damage to your site. Seriously consider enabling Two Factor Authentication on editors and enforcing strong passwords to keep these accounts safe.

Author:

Next is the author role. The author role is a much more limited role. Out of the box, basically an author can: upload files and create, edit, publish or delete his own posts.

Who should get the Author role?

The author role is great for guest posters on a blog or regular authors whose only function is to write and edit content.

Subscriber:

A subscriber is a guest that has registered with your site. They have no capabilities other than to be able to read content and edit their information

Some sites have content that is not visible to users unless they register. The subscriber is a good role to use for that. You will need a plugin to be able to hide content from users who are not of a given role or higher, but those are easy to find in the WordPress Plugin Repository.

Other Roles:

Many plugins you install like WooCommerce will add new roles and new capabilities to WordPress automatically. For instance, When you install WooCommerce, it adds the role “Customer”. A Customer has certain capabilities that mainly deal with them being able to view and change their own data, view their roles, etc. People are moved into the “Customer” role when they purchase something and set up an account on your site.

How to Assign WordPress User Roles to Your Site Users

WordPress does not come with a built in-role and capability editor (more on that below). You can however assign your users to different roles. There are two ways to do that with a standard WordPress install.

1. Manually

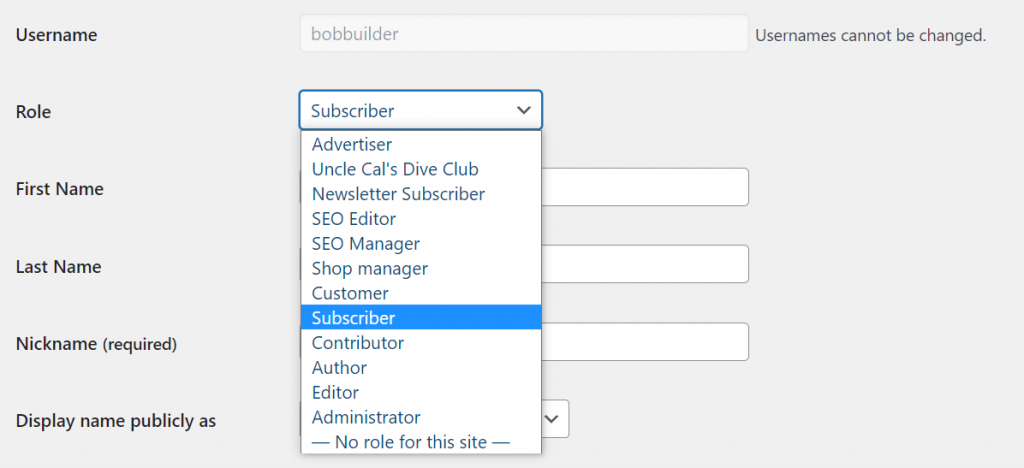
For each user on your site, you can bring them up in the User Editor and select the role you want them to have.

In the above screenshot, I have selected Subscriber for my site member Bob the Builder. You can assign – and re-assign – roles as often as you like.

2. Automatically

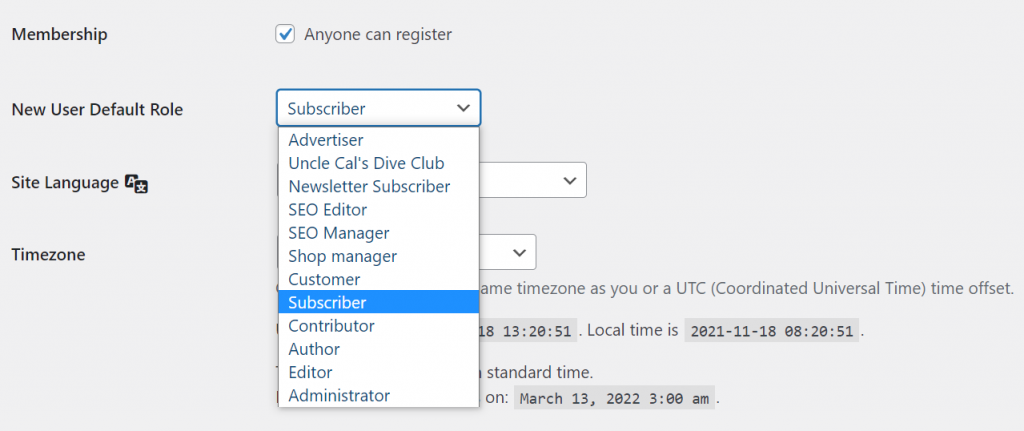
Using an account with the role of Administrator, you can go into the WordPress Admin Dashboard and select Settings > General. There you will find a drop down that allows you to decide what role users will be assigned automatically when they register with your site. This defaults to “Subscriber” but you can set it to any role you like.

How to Manage and Edit WordPress User Roles and Their Capabilities 

As I said, almost all of the capabilities are reserved for the administrator, that doesn’t mean you can’t change things around. There are times when you may want your contributors to be able to moderate comments, a capability usually reserved for Editors. WordPress is flexible enough to allow you to move capabilities around and even create new roles. 

Out of the box, there is no good way to look at what roles and capabilities are set up in WordPress nor create new ones. If you are a programmer, you can of course write code to show them to you and even write code that will create new ones. Where’s the fun in that though? 

Like everything in WordPress, the easy way to manage roles and capabilities is to install a plugin. Also, like everything in WordPress, there are a lot of good plugins to choose from that will help you see, manage, and create user roles and capabilities.

Because there are so many plugins out there, I can’t tell you which one is best. I can, however, tell you which one I use. I use User Role Editor by Vladimir Garagulya and have for a while now. 

The biggest reason I chose this particular plugin is that it does the job. The second biggest reason I chose it was because it’s free and I am cheap. When I say free, I mean that I use the free version. Vladimir has several options out there for those who want the advanced features and this code is well worth the money.

How to Manage WordPress User Roles With User Role Editor

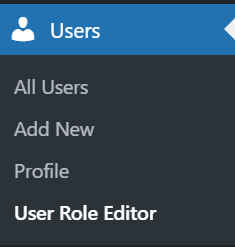
After installing User Role Editor, you will probably notice that it didn’t add yet another menu item to your left sidebar. Instead, it adds a sub-menu item to the “Users” menu, “User Role Editor”.

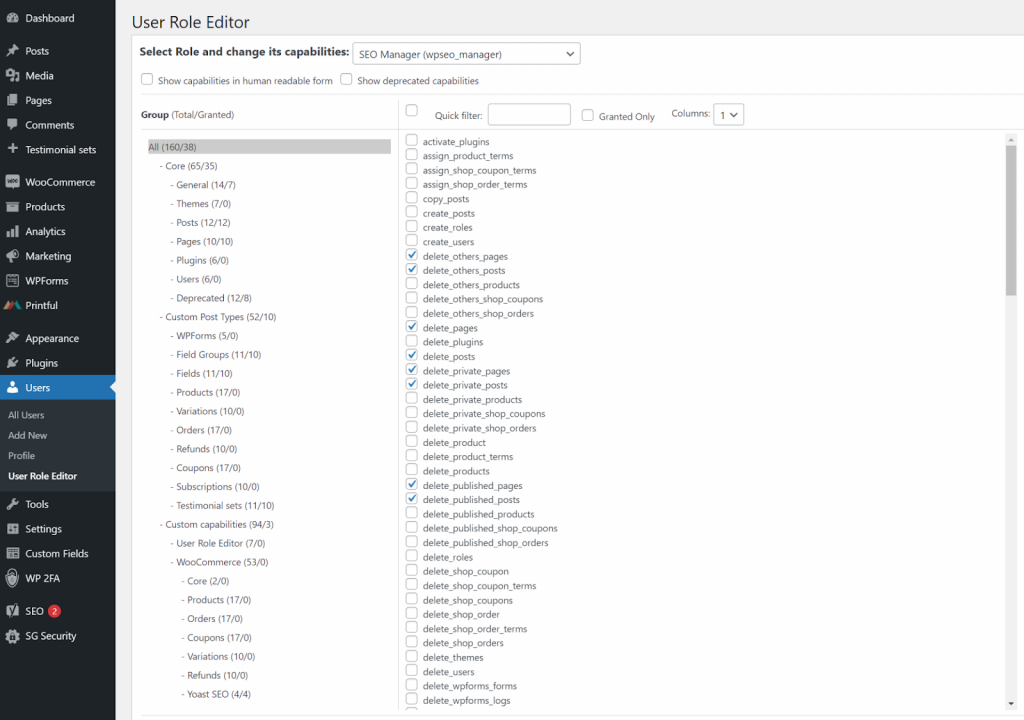
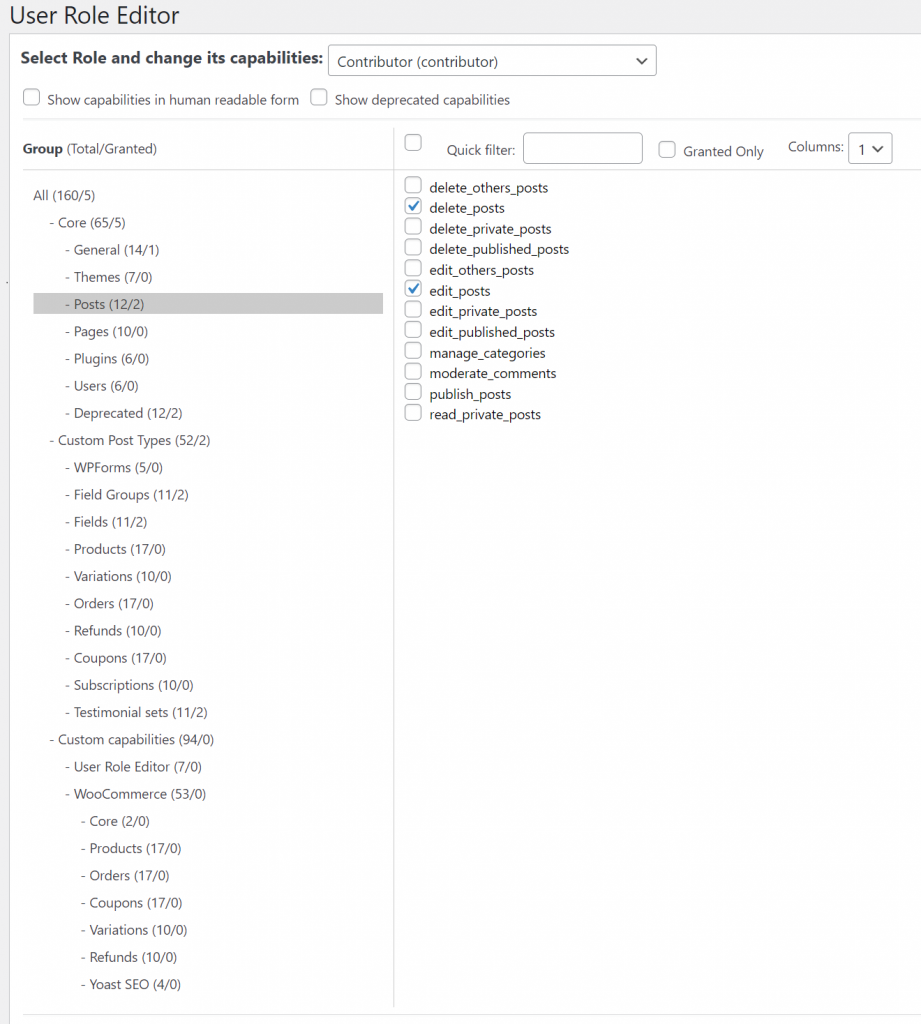
Click on that and you get a complete list of all the capabilities currently in use on your system.

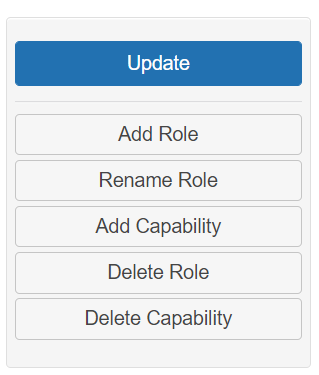
On the right side of the list are a series of buttons that allow you to add new roles and capabilities.

The screen layout can be a little confusing at first. However, once you begin to poke around and see how things are laid out, you begin to get the feel for it.

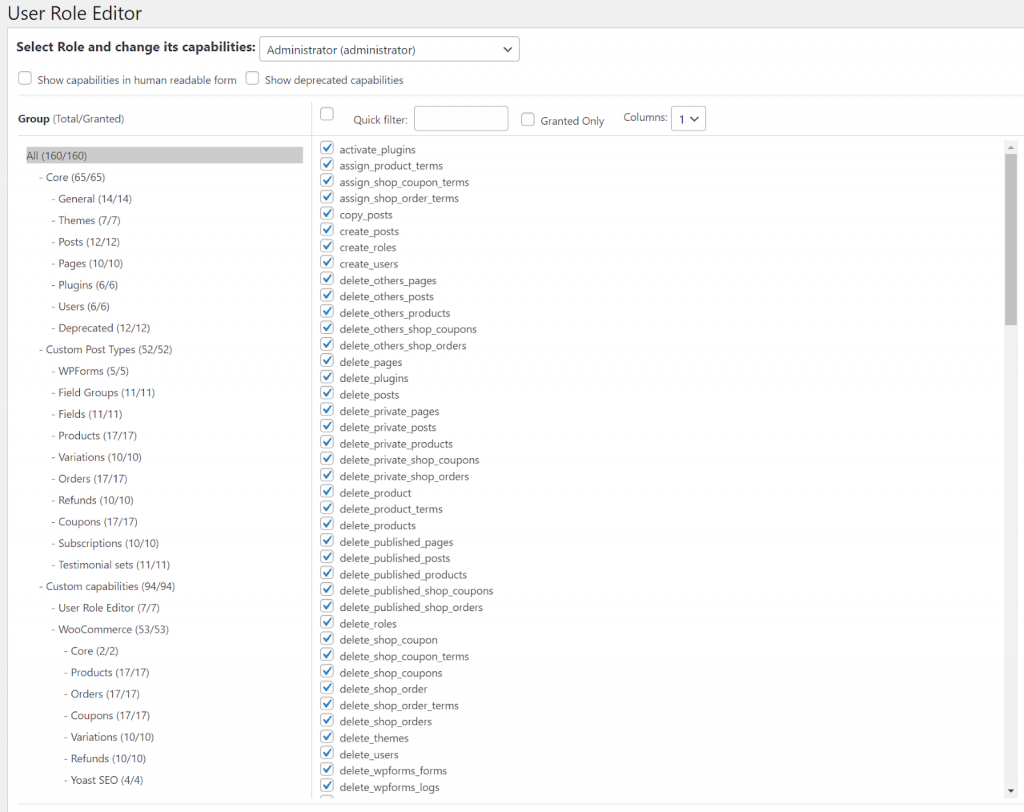
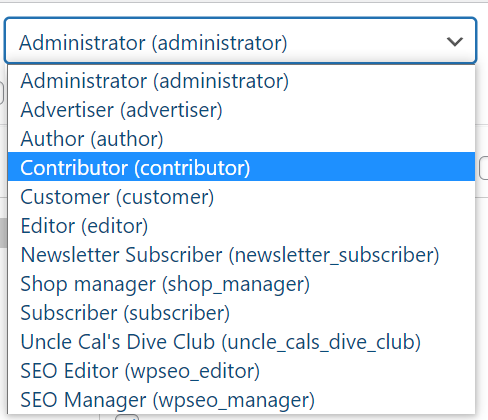
As you can see, if you select the “Administrator” role in the dropdown at the top of the screen, it shows you all the capabilities that the Administrator role has access to. (Hint: All of them)

The tree on the left is how the capabilities are broken down and organized. This way you don’t have to scroll through the entire list to find that one you want to turn on or off.

To use the example I used above, if I want my contributors to be able to moderate comments, the first thing I do is select “Contributor” from the list of roles.

Once selected, I see that almost all of the checkboxes disappear. On the tree on the left, each category gives me 2 numbers, the number of capabilities in that category and the number of capabilities this role has in that category. In the case of “Contributor” most of the second number are 0.

Using the tree on the left, we can select “Posts” to find the moderate comments capabilities.

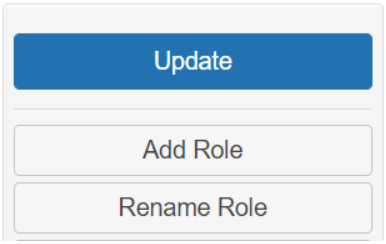
To grant our contributors the ability to moderate comments we just check the box and click “Update” on the right. 

That’s all there is to it. Now any person who logs in and is a “Contributor” will have the ability to moderate comments on posts.

That gives you a feel for how easy it is to manage existing user roles and capabilities.

How to Create New WordPress User Roles and Capabilities With User Role Editor

What about new Roles and Capabilities? Are those as easy? Yes, they are.

On the right, click “Add Role” and follow the prompts.

If your new role is similar to an existing role, it even gives you the ability to clone an existing role to save time. Then you can simply change the capabilities of your new role to suit your needs.

New Capabilities on the other hand are a little more difficult. Yes, you can define them in the interface but unless there is code written to use the new capabilities they won’t have any effect. Before you start adding capabilities, talk to your programmer.

WordPress User Roles Security

So as you’ve seen it’s really easy to add new roles and customize them to fit your needs. Just because it’s easy though doesn’t mean you should add a bunch of them willy-nilly. Before you start, sit down and decide why a new role is necessary. What will this new role be able to do or not do that is different from existing roles. The more roles you add, the more you have to manage.

Also, there are 2 things you can do for better WordPress security in terms of user roles:

Apply The Principle of Least Privilege

Once you have decided to add a new role into your system make sure you adhere to the Principle of Least Privilege. When creating roles, less is more. Only give your new roles the minimum capabilities they need to fulfil their role. If you are setting up an accounting role, don’t give them the capability to Delete Posts. Stick with the minimum, you can always add later if you need to.

Implement Two Factor Authentication (2FA)

For every new role you setup that has significant permissions, make sure you setup and enforce Two Factor Authentication for those roles. 

If the Administrator role is the only significantly powerful role you have, then the SiteGround Security Plugin is a great option. It makes setting up 2FA for the Admin Role very simple. Here is a demo on how it works.

If you have other roles that have significant power or can see Personally Identifiable Information (PII) for other users, make sure they have 2FA enforced as well. There are several good (free) 2FA plugins out there that can help you do that.

Wrap Up

WordPress has a power user role and capability system that is flexible enough to meet almost any site’s needs. Like any powerful tool though, you can do damage to your site. You can lock users out of capabilities they need to access the site or give users the power to do bad things.

Before you start, stop, think, and then act. That is the winning strategy for managing user roles and capabilities in WordPress.

[subscribe_cta]

The Best WordPress Backup Practices, Solutions and Plugins

For as long as there have been WordPress, site owners, managers, and developers have worried about how to backup WordPress. Even in the early days, WordPress was a complex system. It could do a lot, but backing it up and restoring it took time, patience, and of course, developers.

Still savvy site owners understood that it was worth the effort to back their sites up. Natural disasters, bad actors, and backhoes were all the enemy of web sites, and without a good disaster recovery program, you could lose everything.

In the early days my absolute favorite solution was a plugin that simply backed up my database each night using mysqldump and then emailed it to me. I thought this was the end-all/be-all of backup solutions. It was easy, it was off-site, and I had an email rule that deleted them so in 300 days, they were gone.

The problem that is obvious now is that my database, while important, is only part of what needs to be backed up.

I do not believe that there is a single best backup plugin for WordPress or solution. I believe that different types of sites have different needs and that WordPress site owners should evaluate their needs and options and pick the best solution for them.

That having been said, any WordPress backup solution is better than no solution at all. If you aren’t backing up your WordPress based website on a daily basis, read the rest of this article, pick a solution, and start backing your site up today.

The Best Solution to Back Up Your WordPress Site Without a Plugin

Backing up WordPress via your hosting partner

Most top-tier web hosts offer backup services as part of their monthly fee. This is going to be a little different than a plugin solution because your web hosting partner has access to the underlying infrastructure and can do things that plugins simply can’t do.

Your hosting partner backup solution will almost always operate faster in both backing up and restoring because they don’t rely on WordPress to do the heavy lifting. This means that if you have a large site or large database, backing up and restoring via your web hosting partner means less down-time.

One thing to look out for when utilizing your web hosts backup and restore is to make sure that the backups are stored off-site. This means not on the same server that your site is stored on and hopefully not even in the same geographic region. 

Heaven forbid that a natural disaster hit the region your site is hosted in and the entire infrastructure is out for an extended time. If your backups are also stored there then you are down for the count.

At SiteGround they are aware of that. They create daily backups of your website, make them available on a rolling 30 day basis, and they geographically distribute your backups to better ensure your data is stored safely.

Expert Tip: Just because you are utilizing your web hosting partner’s backup service doesn’t mean that you don’t still have a responsibility to keep a backup of your site locally. If no automated service is available, log in once a month and download the last backup of the month to your local computer as an absolute last resort.

How to Back Up Your Website with a WordPress Plugin

Take in mind these 2 questions by the time you will need to choose a WordPress backup plugin that best fits your needs.

What should a WordPress backup plugin back up?

A good WordPress backup plugin or solution backs up at the very minimum 2 things.

  1. Your database
  2. Your uploads directory

In addition, you may also want to back up:

  1. WordPress Core
  2. Your Themes
  3. Your Plugins

The reason I don’t list these in the must-backup section is that these can usually be downloaded and installed thus you don’t technically need to back them up. Still, it’s a good idea to include these in your backup because it makes restoring a site much easier.

What should a WordPress backup plugin do?

A good backup solution should cover at least these three points.

  1. Backup your site
  2. Store the backup in a different location. In tech, we call this “off-site”. That’s a hold-over term from when we used to back things up on tape and then physically take the tape to a different site. 
  3. Restore your backup. A good backup solution is only 1/2 the problem, you need to be able to USE those backups in case of an emergency. Most plugin based solutions require you to re-install WordPress and their plugin before you can restore. Usually this isn’t a problem, but solutions that are provided by top-tier web hosting providers are better in that they can restore everything.

The Best Backup Plugin for WordPress I’ve Tested

Now that we understand what a backup solution should do, let’s look at the best plugin that I have found for backing up WordPress.

UpdraftPlus

UpdraftPlus is the one I am using on about 70% of my sites and I consider it the best free backup plugin for WordPress. The paid version is even better! 

UpdraftPlus is a “freemium” plugin in that some of the features are free, others cost you money. So far I’ve not needed any of the premium features. That doesn’t mean they aren’t worth the money, UpdraftPlus starts at only $42/year for two sites.

UpdraftPlus doesn’t automatically store your backup off-site. You need to set up where you want them to be stored. If you don’t set up an off-site storage then they are just backed up to your server’s local file storage. I strongly urge you to set up off-site backups.

The good news is that UpdraftPlus will work with dang near anyone when it comes to storing files off-site. 

  • Dropbox
  • Google Drive
  • Amazon S3 (or compatible)
  • UpdraftVault
  • Rackspace Cloud
  • FTP
  • DreamObjects
  • Openstack Swift
  • … and email

My favorite is Amazon S3 and any service that utilizes the Amazon S3 API. Since I already store a lot of things on S3, it was easy for me to set this up and get it running.

Since FTP (and I assume SFTP) is on the list, you can use UpdraftPlus to store your backups anywhere you have an (S)FTP server. That’s most places these days.

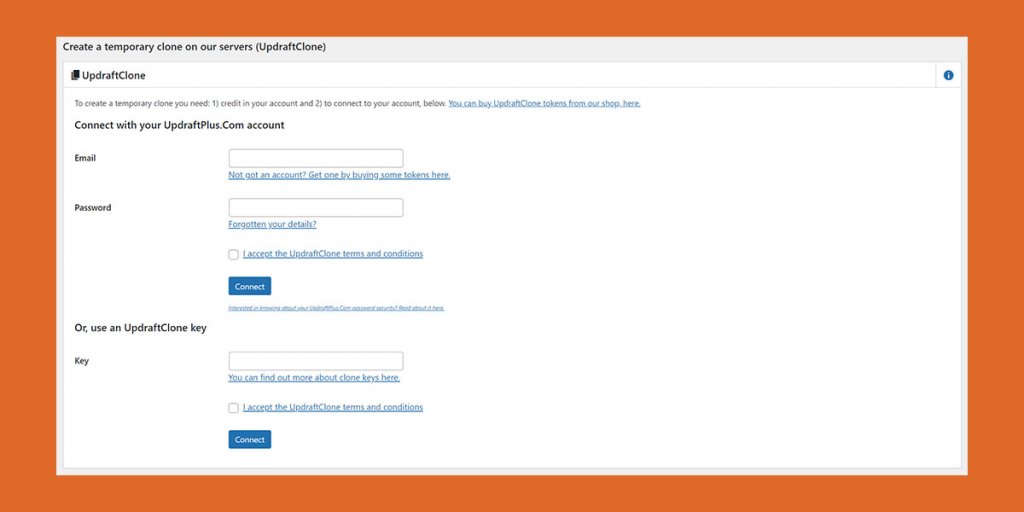
UpdraftPlus can be used to migrate sites as well. Each license comes with “Clone Tokens” that you can use to clone a site. 

One of the things I love about UpdraftPlus is that if you are using WP-Optimize by the same company and you have UpdraftPlus installed, before you do any database optimizations or changes, it asks you if you want to back everything up first. I love that they take the time to help me not shoot myself in the foot. 

Restoring a WordPress site via UpdraftPlus is as easy as selecting the menu option and then the backup to restore. 

The plugin will do the rest. Since this requires WordPress and the plugin to already be installed, if you are having to restore from scratch then you will have to install WordPress, install UpdraftPlus, and configure your off-site storage before you can restore the rest of the site. 

Bottom line, as far as plugin backup/restore solutions go, UpdraftPlus is a solid one. It is easy to use and the free version works very well.

Wrap Up

As I said, there is no single best WordPress backup plugin or best WordPress backup solution. The best solution is the one that gives you, the site owner, peace of mind and the ability to get a good night’s sleep because you know you’ve got a backup.

Sometimes that is a paid backup solution, other times it’s a free solution. However, you decide to back up your site, the important thing is that you do backup your WordPress site.

[subscribe_cta]