

Best Website Speed Optimization Tips and Tricks

Website speed optimization is crucial for creating a positive user experience. A positive user experience is marketing speak for happy users. Happy users visit your site and buy things. Unhappy users leave because they are tired of waiting for your website to load. Marketers call this “bounce rate” but really, it’s just unhappy users.

Why is site speed so important?

In the early days of the web, our mantra was “Content is King”. These days, if content truly is King, the Queen is speed. They go hand-in-hand. The best content or even product or service in the world won’t get noticed on a slow website.

User experience (Usability)

As we said above, a slow website can lead to a poor user experience. This can cause visitors to leave the site and potentially lead to a high bounce rate. A fast website, on the other hand, leads to a better user experience, which increases user engagement. When people don’t have to wait for the page they want to read to slowly load, they are more likely to stick around and read it. If that page is selling them your widgets, then they are more likely to buy them because they read your page.

Ranking Factor (Visibility)

Search engine algorithms have taken into account website speed for a few years now. All things being equal, if you have two websites that have equally good content on a given topic, the faster one will rank higher. Additionally, a faster website can lead to a better user experience, which can also have a positive impact on SEO.

All search engines have announced that they now use website speed as a ranking factor for their mobile search results as well. This means that a website that is not optimized for speed may rank lower in mobile search results than a faster website, which could lead to a decline in both traffic and revenue.

Website speed optimization is critical for your business if your users are primarily mobile.

Conversion (for E-commerce sites)

When a website is slow, users may become frustrated and abandon their shopping carts, leading to lost revenue for your business. A fast website, on the other hand, can provide a seamless shopping experience, which will increase conversions and ultimately drive more revenue.

Amazon is famous for computing the price of a second of load time. The slower their site loads, the less they sell and they know exactly how much. You may not be able to calculate your loss like that, but you will see that when you optimize your website’s speed, your sales will increase.

In summary, if you aren’t getting the page views you think you should be, maybe it’s time to look at optimizing your website speed. Optimizing your website for speed can lead to a better user experience, improved search engine rankings, and higher revenue. Here are our best website optimization tips and tricks:

How to check the performance of your website

There are many good tools on the web to help you compute your website’s speed so you can tell if your site is running fast or not.

SiteGround Optimizer Plugin and Google PageSpeed

One of the best tools for measuring website speed metrics out there is Google PageSpeed. There are several tools you can use to increase your site’s PageSpeed score, my favorite is the SiteGround Optimizer plugin. I have it installed on almost all of my WordPress sites and using it, my Google PageSpeed score is only a couple of clicks away. If you already have SiteGround Optimizer installed, then just click on the menu and select “Speed Test”. If you don’t yet have SiteGround Optimizer installed, it’s free and works even if you don’t host with SiteGround.

As a bonus, if your score isn’t as high as you want it, SiteGround Optimizer will help you increase your score. After implementing the suggestions, SiteGround Optimizer had for one of my graphic-heavy sites, this is my Google PageSpeed score.
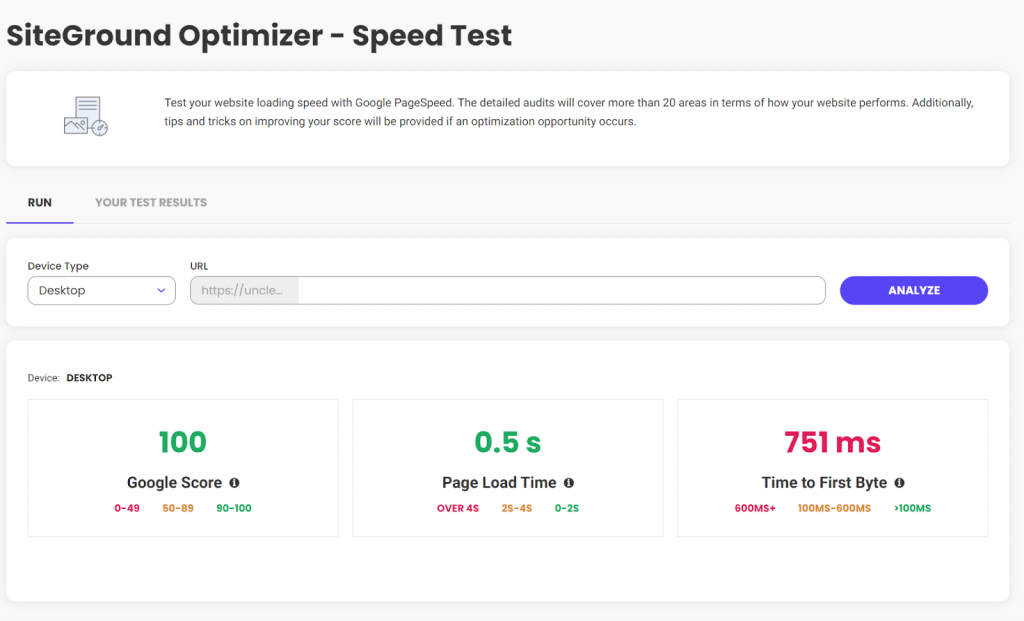
Yeah, that’s not bad at all.

webpagetest.org

The other tool I’ve been using for the past 10+ years is webpagetest.org. Whereas Google PageSpeed boils everything down to three easy-to-understand numbers, if you want to dig into the details, you need a tool like webpagetest.org. It gives most website owners more information that is easily digested, but if you spend the time to learn what the numbers mean, they can give you some deep insights into why your website loads the way it does. webpagetest.org also lets you configure things like desktop vs. mobile, where you are testing from, etc.

6 Undisputable Website Optimization Tips

Now that we’ve discussed why website speed optimization is so important, let’s talk about six things you, as a non-technical site owner, can do to make sure you are running at optimal speed.

Achieve lightning-fast loading times by choosing the right host

Choosing the right web host is one of the most important factors in website speed optimization. It is also the first decision you need to make. Honestly, if your host is slow, none of the rest of these optimization tips are going to make much difference.

Choose a website theme that won’t weigh you down

If your site uses WordPress, the theme you choose for your WordPress website will have a significant impact on its speed. A well-designed and optimized theme can help improve website speed and performance, while a poorly designed theme can have the opposite effect.

All themes can stand to lose a little weight, even the best ones. So to help your site reach its maximum speed, make sure that you have SiteGround Optimizer installed and configured. As discussed above, it can really make a difference in your site’s overall speed.

When choosing a theme for your website, it’s important to consider things like code quality, graphic sizes, and support.

Code quality

A well-coded theme will be lightweight, use minimal resources, and be optimized for speed. It is important to choose a theme that is coded to the latest web standards, WordPress standards, and has been reviewed by other users. 

Graphics Sizes

All themes will let you use your graphics, however, some work with plugins to optimize graphic size, while others do not. If you choose a theme for your website that does not automatically optimize the graphic sizes for speed, all is not lost, you can install the SiteGround Optimizer plugin. It will not only optimize all of your existing images, but will automatically optimize any new graphic as you upload it.

Support and updates

A theme that is regularly updated and supported by the developer can help ensure that your website stays optimized. As technologies change, you want to make sure your theme changes with them to ensure it is always the fastest that it can be.

If you have a WordPress website, hosted with SiteGround, you benefit from their in-house WordPress Autoupdate feature, which automatically backups and upgrades your site each time there is a new WordPress version, along with all of your plugins, if you wish so. That helps you avoid vulnerabilities related to the old application, and you’re up to date with the latest security fixes.

Choosing the right theme is just one part of website optimization. You’ll still need to do things like minify code, and use caching to help improve website speed.

The theme you choose for your WordPress website can have a significant impact on website optimization. By considering the factors mentioned above, you can choose a theme that is well-designed, optimized for speed, and will provide a better user experience for your visitors.

Trim down unnecessary plugins

In the past, I’ve written about removing unused or deactivated plugins. One of the main reasons to do this is speed. The less code there is, the faster your site will run. Even disabled plugins force WordPress to decide between them at each page load. If you delete them, WordPress doesn’t need to worry about them.

Once a year – or more frequently, if possible – you should do a complete audit of the plugins installed on your site. Deactivate and delete any that are not actively being used. If you need them again later, then reinstall them later.

Remove unnecessary redirects

Redirects will affect website speed optimization.

They add an additional step to the page load process, which can increase the amount of time it takes for a page to load. This will negatively impact the user experience and website speed.

Search engines follow redirects to find the final URL of a page. When search engines crawl your website, they follow each redirect, which can slow down the crawling process and affect your website’s SEO. Additionally, redirects can cause the search engines to see the redirecting page and the final page as two different pages, which can lead to duplicate content issues and affect the website’s SEO.

Redirects can be confusing for users and will lead to a poor user experience. If a user clicks on a link that redirects them to a different page than they expected, they may become frustrated and leave the website.

Redirects can be useful in certain situations, such as when a web page has moved or is no longer available, or when you want to redirect traffic from a non-preferred domain to a preferred domain. In these cases, it’s important to use the correct type of redirects and to minimize the number of redirects used to maintain website speed and SEO.

To avoid the negative impact of redirects on website optimization, it’s important to use them sparingly and to use the correct type of redirect. Additionally, implementing a proper redirect strategy and keeping track of the redirects that are in place can help to minimize the negative impact on website optimization.

Cache your way to faster load times

Caching can have a positive impact on website optimization by improving your website’s speed and performance. Caching is the process of storing a copy of a web page or its resources, such as images or scripts. When a user visits a website, their browser can load the cached version of the page, which can reduce the amount of time it takes for the page to load.

Caching can be implemented at different levels, such as browser caching and server-side caching. Each type of caching can have a positive impact on website optimization.

Browser caching

When a user visits a website, their browser stores a copy of the web page and its resources on their device. When the user visits the website again, their browser can load the cached version of the page, which will dramatically reduce the page’s load time.

If you’re using the SiteGround Optimizer plugin for WordPress, available for free download on any hosting platform, you can use the browser caching option it provides. This feature stores the static content of your website in the users’ browsers and cache longer. If you’re a SiteGround client, this option in the plugin will be enabled by default for you.

Server-side caching

Server-side caching can reduce the amount of time it takes for a page to load by storing a copy of the page on the server. When a user visits the website, the server can deliver the cached version instead of having to regenerate it each time. This will reduce page load time.

If you’re hosted with SiteGround, you already take advantage of their powerful caching technology – SuperCacher which includes three levels of server-side caching: 

  • NGINX Direct Delivery
    Caches static content like images, CSS files, JavaScript
  • Dynamic Cache
    Dynamic cache caches your dynamic content and stores it in the server’s RAM
  • Memcached
    An object caching mechanism designed to improve the connection between your application and its database

When all these three are in action, they improve your website performance up to 5 times!

Speed up your site with CDN

A good CDN, or Content Delivery Network, is a critical next step for optimizing your website’s speed. A CDN is a group of servers in different locations around the world that work together to deliver your website to users faster by delivering large files from servers near your users.

When a user visits your website, the CDN will direct them to the server that is closest to them. This can help reduce the distance between the user and the server, which will improve website speed.

CDNs also help to reduce the number of requests made to your server, which can help to improve website speed. This is because CDNs can store a copy of your website’s files, such as images and videos, and deliver them to users without having to request them from your server.

The less work your server has to do, the faster it will do the work only it can do.

Using a CDN will help to improve the website’s speed and that will create a better user experience for your visitors. It’s a great option to consider if you want to optimize your website and reach a global audience.

You can use a third-party CDN, which will take some time and extra knowledge to configure. Alternatively, you can ask your host to help you select one and then pay them to configure it. A better option is to use SiteGround’s native CDN. SiteGround has a one-click CDN that is already integrated and configured for your site. They offer the essential features free for all customers hosting websites on their platform. For those needing more, they offer a premium version for heavy international traffic websites.

How to Speed up Your WordPress Website Like a Pro – Video Tutorial

Conclusion

Entire books have been written on the topic of optimizing a website’s speed. In this article, we’ve taken a look at why it’s important, discussed some tools you can use to see how fast your site is now, and then six things you can do without the help of a programmer to speed things up.

It is important that before you start tinkering with your website to optimize it, you check its speed first. Then, do one thing at a time and after each change you make, re-test. This is the only way to tell for sure that you are making things better and not worse.

[subscribe_cta]
PHP 8.2 Is Now Stable and Available on SiteGround Servers

stable release of php 8.2 version

PHP 8.4: Stay Updated! 🚀 Check out our latest blog post to explore the newest features and enhancements in PHP 8.4.

It’s that time again! Time for the Santa ElePHPant to visit all the good little PHP developers around the world and shower them with new goodies that make it easier for them to build the web.

As of this writing, PHP 8.2 is in Release Candidate 1 (RC1) status. We are in the late stages of development and bug fixing for this version and you can tell because forward looking web hosts like SiteGround are now making the RC builds available for their clients to test with. (Did you see the word TEST there? For those who don’t know what that means, it means NOT IN PRODUCTION!)

So let’s take a look at some of the new presents that Santa ElePHPant is bringing us.

New Goodies

First up, let’s take a look at a few of the new features that will be of interest to PHP developers. This is not an exhaustive list of the new goodies in Santa ElePHPant’s bag. It’s more a short list of the things I think the majority of PHP developers will be interested in.

readonly classes

In PHP 8.1 we got readonly properties for classes. This was a great leap forward for a lot of projects. However, there is still a small hole that needed to be plugged, clases. Yes, you can make every typed property in a class as read only and you are good to go, but honestly, that’s a lot of typing and if we know anything, we know that developers are lazy. So instead, in PHP 8.2 we can mark an entire class as readonly.

readonly class MyClass {
    public int $myProp;
    public string $myOtherProp;
    public __construct(string $myOtherProp, int $myProp) 
    {
        $this->myProp = $myProp;
        $this->myOtherProp = $myOtherProp;
    }
}

Here we have a class defined as readonly. We have 2 properties of the class and both of them are inherently readonly. The readonly rules from PHP 8.1 still apply. You can initialize the property only once, after that it is set. 

$myObj = new MyClass(‘Cal was here’,42);

However, once they are initialized, they are now immutable.

$myObj->myProp = ‘Cal is no longer here’;

// Fatal Error: Uncaught Error: Cannot modify readonly property MyClass::myProp

One other behavior of the readonly class is that properties cannot be dynamically added to the class, ever. Below we talk about deprecating Dynamic properties and how that’s a good thing. There is even an annotation that allows you to override this. However, if you mark a class as readonly, then it cannot be overridden.

Constants in Traits

Traits have been with us in PHP since PHP 5.4. They have long been the language’s answer to “composition over inheritance”. Now traits are getting an interesting new feature, the ability to define constants in a trait.

trait MyTrait {

    private const MY_CONSTANT = 42;

}

Now, if your trait uses a constant, you can define it in the trait and not have to remember to define it in each class that uses the trait.

trait MyTrait {

    private const MY_CONSTANT = 42;

    public function meaningOfLife() : int

    {

        return self::MY_CONSTANT;

    }

}

class MyClass {

    use MyTrait;

}

$myObj = new MyClass();

echo $myObj->meaningOfLife(); // prints 42

Like everything in life, there are a few rules.

Traits can define class constants. If a class uses that trait it can also define the same class constant as long as both the visibility and value are exactly the same. So the example above works but the one below will trigger a fatal error

trait MyTrait {

    private const MY_CONSTANT = 42;

    public function meaningOfLife() : int

    {

        return self::MY_CONSTANT;

    }

}

class MyClass {

    use MyTrait;

    public const MY_CONSTANT = 42;

}

Still, even with the rules that you have to follow, this is a real step forward. Traits are a great way to share code between classes and now they are even more self-contained.

Random Extension 5.x + Random Extension Improvement

The original PHP random number generator is still in the base code. It’s never been great and it’s absolutely useless for cryptographic uses. In PHP 7, we got a couple new functions, random_int() and random_bytes(). They went a long way to fix the problems but under the hood, they are just interfaces to the native OS’s random number generator. At the time this was a good solution but the problem is it’s a slow one. 

Now with PHP 8.2 we get not only an entirely new Random number generator, it is built into PHP,  and we get an extensible object oriented interface to it.

This is actually two different RFCs that I’m lumping together. After the first one “Random Extension 5.x” was voted on and passed, it was discovered that there was a few issues with it. A second RFC, “Random Extension Improvement”,  was prepared and voted on to fix the issues found with the first one.

The end result is a new set of classes that give us better pseudo-random numbers in PHP.

While we are actually getting several new random number generators (RNG), for simplicity I’ll discuss the new Random\Engine\Secure class.

$engine = new Random\Engine\Secure();

$randomString = $engine->generate(); // a random binary string

echo bin2hex($randomString); 

Now if we want to do something like sort an array, we need one of the new Randomizer objects. 

$randomizer = new Random\Randomizer($engine);

$items = range(1, 10);

$randomizedItems = $randomizer->shuffleArray($items);

print_r($randomizedItems);

Now in the above example, we used the Secure engine. The secure engine does not accept a seed and will always generate a non-reproducible string. The engines that allow you to specify a seed will produce the same results each time if you use the same seed. 

The Randomizer class also provides several other methods that are really what PHP developers are looking for.

  • getInt() : int
    This replaces the old mt_rand() function
  • getInt(int $min, int $max) : int
    This replaces both the old mt_rand() function as well as the newer random_int() function.
  • getBytes(int length): string
    This replaces the random_bytes() function 
  • shuffleArray(array $array): array
    This replaces the old shuffle_array() function
  • shuffleString(string $string): string
    This replaces the old str_shuffle() function

Among other things, since this brings all of the randomizing functionality into a single area of the engine, it streamlines the core code and will make further improvements easier.

“So long and thanks for all the fish”

All good things must come to an end and that includes some features and commands of PHP. Let’s look at a couple of the important deprecations that if you aren’t careful will end up causing you problems.

Deprecate dynamic properties

At first blush, this one seems like it’s going to be a huge problem. Since PHP got the current object model, it’s been possible to add properties to an object any time you want. Now somebody thinks this behavior is a bad thing. (HINT: It was always a bad thing but one a lot of developers took advantage of.)

class MyClass {

    public string $name;

}

$myObj = new MyClass():

$myObj->nmae = ‘Cal Evans’;

Notice that I misspelled the property name. I know I’m probably the only developer who has misspelled a property name but in PHP when it happens, I get a new property on the object and the original property remains unchanged. That was not my intent.

Starting with PHP 8.2, this will emit a DEPRECATED WARNING.

There are 3 exceptions to this new rule.

  1. Any instance of StdClass will still be able to accept dynamic properties.
  2. Any class with magic __get() and __set() methods will still accept any property.
  3. Any class that has the compiler annotation #[AllowDynamicProperties] and any child class will allow dynamic properties to be set.

So while all is not lost for those that depend on this “feature” of PHP, if you are still going to use it, you are going to have to make some changes to your code. 

The good news is that all that will happen right now is the warning emitted to the log files. So while it might fill up your log files reminding you that you need to fix this, PHP 8.2 won’t break your code. That happens in PHP 9.0 when the warning – and the ability to automatically add dynamic properties – gets removed from PHP.

(Partial) Deprecate ${} string interpolation

This is another depreciation that on the surface I thought was going to be a huge deal. Turns out, it is probably not going to affect many developers.

There are 4 ways to implement the “{$variableName}” syntax, 2 that make sense, and two that don’t. The two that don’t are going away.

echo “$meaningOfLife”;

By far, this is the most common version of string interpolation. Just put the variable in a string with double quotes. If you are doing this, you are fine, this is one of the two ways that are staying.

echo “{$meaningOfLife}”;

echo “{$dogulasAdams->meaningOfLife()}”;

I always considered this way “old-skool”. Yeah, we used to do it way back in the day but I’ve not done it this way in a long time. Still this works, it’s clean, and it’s easy to understand. This is the other one that is staying.

This is also the only method that allows you to use object properties and methods. So if you want to use string interpolation with an object, you will need this method.

echo “${meaningOfLife}”;

This one is going away. Yes, it does the same thing as the first two, but it is a little more confusing because the $ is outside of the braces. 

$fourtyTwo = 42;

$meaningOfLife = ‘fourtyTwo’;

echo “${meaningOfLife}”;

Finally, we have the way that you can use “variable variables” from within string interpolation. This is just too many levels of indirection. In the code above, we eventually get to the point where we echo out 42, but we take the long way around. 

Starting in PHP 8.2, the last two structures will emit a DEPRECATION WARNING in your log files. In PHP 9.0, they will stop working altogether and cause your program to crash. (or throw an Error that you can catch, but probably can’t recover from.

Wrap Up

This is the first PHP 8.2 Release Candidate. Don’t play with it on any production site. If you want to test it with an existing site, set up a new site for testing, clone your production site into it, and play with that. When you are done, you can just delete it. 

As you poke around in your new testing environment, check your log files after every test. Make sure nothing fails and see if any new WARNINGS pop up. 

If PHP 8.2 is anything like PHP 8.0 and PHP 8.1, I don’t expect modern PHP code to have issues with it. Thankfully, Santa ElePHPant’s Elves that work for SiteGround make it incredibly easy for you to test things out to make sure your site can run as fast as possible with PHP 8.2

Speaking of performance, PHP 8.2 hasn’t been properly benchmarked yet, but we have come to expect every version of PHP to be a little faster than previous versions. With changes to the CSPRNG system and other things like removing the old libmysql, it’s a safe bet that this version will be faster than PHP 8.1.


While you are testing, cloning, and observing results, make sure you take time to tweet out a huge THANK YOU to Santa ELePHPant and all of the little ElePHPant Elves that made this release possible. Rumor has it that they keep an eye on twitter.com/@php_net

To celebrate the latest release candidate PHP 8.2, we are giving away 5 exclusive SiteGround PHP elephant plush toys (a.k.a Groundy) in a raffle, running from September 8, 2022 until September 11, 2022. Read more on Twitter.

[subscribe_cta]

Don’t Fall for Email Scams This Black Friday

phishing emails during Black Friday

The infrastructure that runs the Internet’s email hasn’t changed a whole lot in the past 30 years. Yes, we’ve layered a few things on top of it like Sender Policy Framework (SPF) and DomainKeys Identified Mail (DKIM) but at its heart, the protocol remains the same. That’s the problem. Email was designed in a simpler time. A time when the Internet was a trusted resource and nobody gave a second thought to the fact that it’s easy to say fudge the headers on an email so that it looks like your boss is getting an email from the President of the United States commending you for all your excellent work. I’m not saying that has happened or that I was a part of it…but hypothetically, it is possible.

So, if email can’t be trusted, what can we do? Well first, these days email is a lot more trustworthy. It is much easier to detect emails sent from someone, but say they are from the President, thanks to things like Sender Policy Framework (SPF) and DomainKeys Identified Mail (DKIM).

Even with these new technologies though, email scams are still rampant. As we charge headlong into the holiday season, let’s stop for a moment and look at a few things you can do to make sure you don’t fall for the latest scam. (Which is not sending emails to unsuspecting bosses…)

Email Scams You Need to Be Aware Of

Let’s take a look at a few of the many ways that bad people try to do bad things to you via email. This first group of scams all fall into the category of Phishing scams. A Phishing scam is basically an email designed to fool you into thinking it is from someone it is not and convince you to click on a link embedded in the email.

The Fake ‘’Account verification’’ Requests

These can seem to come from your bank, Netflix, Twitter, or one of those sites that you don’t admit to having an account on. It doesn’t matter where they are coming from, they all have the same basic message. 

“Your account has been locked for a REASON. To unlock your account before we delete it totally, click on this link.

Here’s a hint, no trusted system out there sends these emails out randomly. If you get one and you are not currently interacting with this organization, then it is almost assuredly a phishing scam.

When in doubt, pull out the paperwork you have for this organization, find a phone number and call them. Ask if there is a problem with your account. When they say no, thank them, wish them a great day, hang up, mark the email as spam, and move on with your life.

The unexpected ‘’Billing error’’ notifications

Did you know that it is possible for bad people to figure things out about you without you telling them? It is relatively simple to find out where a website is hosted. When bad people find out information like this, they like to use it for their gain and your loss. Such is the “Billing Error” notice.  

For instance, if you are a SiteGround customer and you get an email from SiteGround notifying you that there has been a billing error and you now owe $XXXXX more, stop. Don’t click any links in the email. Instead, go to the SiteGround support page and start a chat session with one of their great support people. They can tell you if there’s an issue with your account or not. 

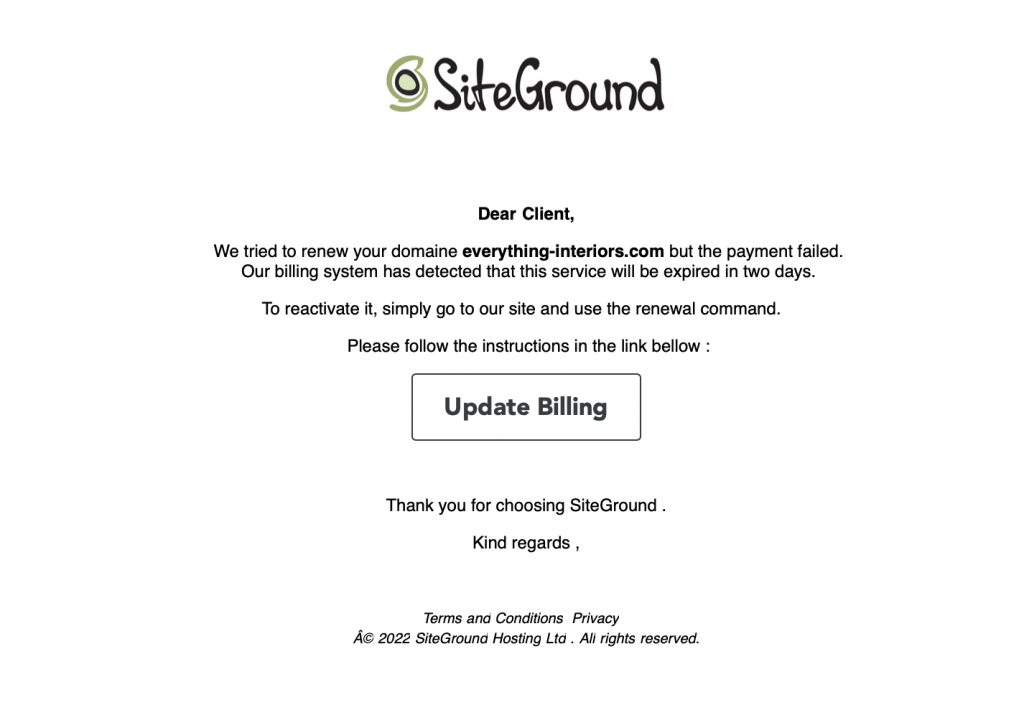
Here’s an example of a phishing email that requests from a SiteGround customer to update their billing details in order to be able to renew their domain:

Scam email example

Notice that this fake email does not contain the name of the recipient, and SiteGround original emails should include the name you’ve used for registering your account. 

Next, notice that this email has grammar and spelling mistakes. These are red flags for a scam email along with the poor formatting. 

Finally, the signature is not the one used by the SiteGround team. 

When you confirm that there is not actually a billing error, thank the nice support person, wish them a wonderful day, disconnect, mark the email as spam, and move on with your life.

The ‘’Order confirmation’’ requests

An oldie but a goodie – and one that pops up a lot these days because ecommerce has exploded – is the “Order Confirmation” email. These are most effective when they are from companies that you’ve never dealt with. They usually involve large sums of money as well. The idea here is to alarm you so much that you will obviously click the link to “Unconfirm” the order. 

If the email looks like it is from a company you don’t do business with, ignore it. Mark it as spam, and move on with your life.

If it looks like it is from a company you do or have done business with, contact them directly outside of the email. Talk with the sales or accounting department and see if someone has placed an order on your behalf… When you find that the answer is no…well, you know the drill by now.

The ‘’Click and collect’’ scam

Thanks to the recent pandemic, “Click and Collect” has become a common way to shop. You buy something online from a nearby retailer. You drive to their store and let them know you are there, they bring the item out to your car. Sometimes, they even put it in your trunk so you don’t have to even meet them face to face.

Nowhere in the Click and Collect workflow is there an email that says “Click here if you didn’t order this.” Treat these the same as Order Confirmation requests. If you don’t deal with the company, it’s a scam. If you deal with the company but haven’t placed an order, it’s a scam. If you are in doubt, contact the company directly, not by replying to the questionable email.

Sometimes, scammers are really REALLY good. They send you an email that looks exactly right.

Real Life Phishing Emails (Well, Screenshots)

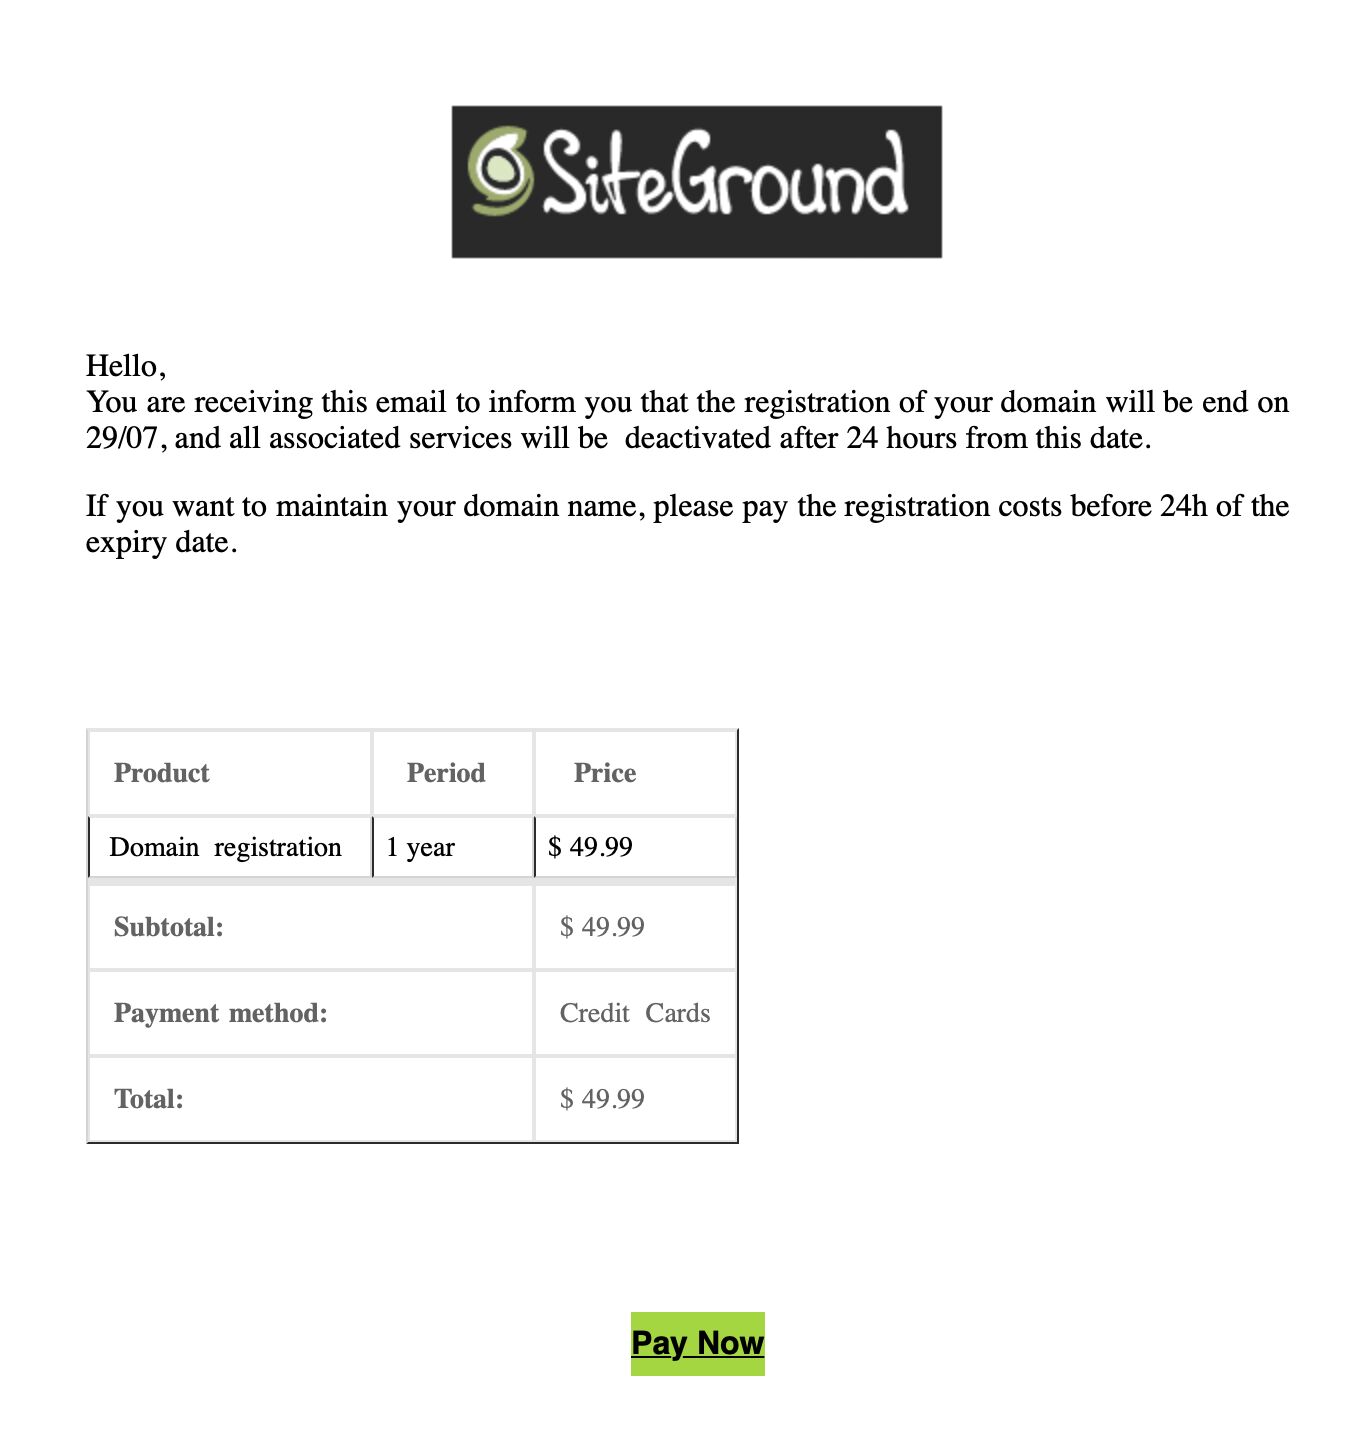
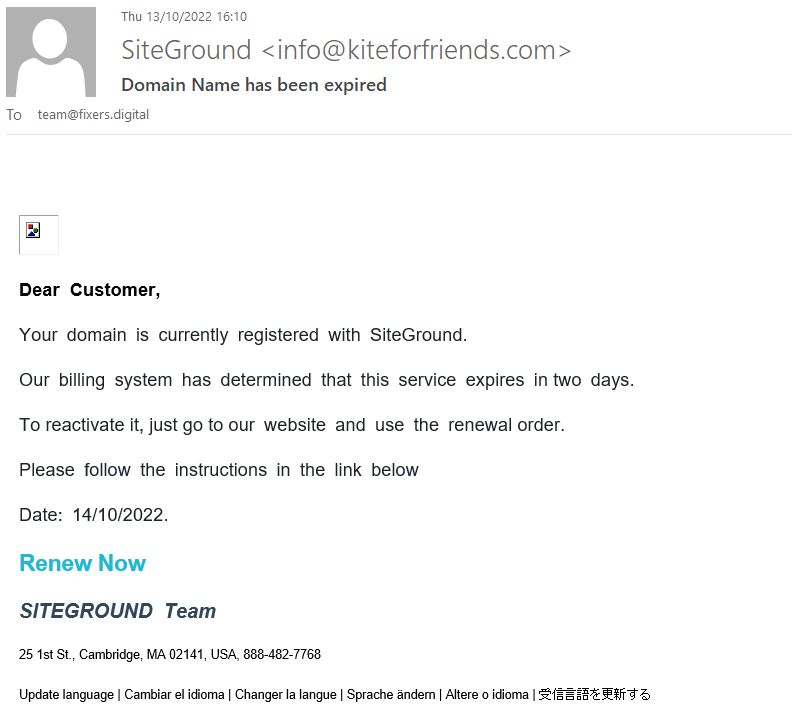
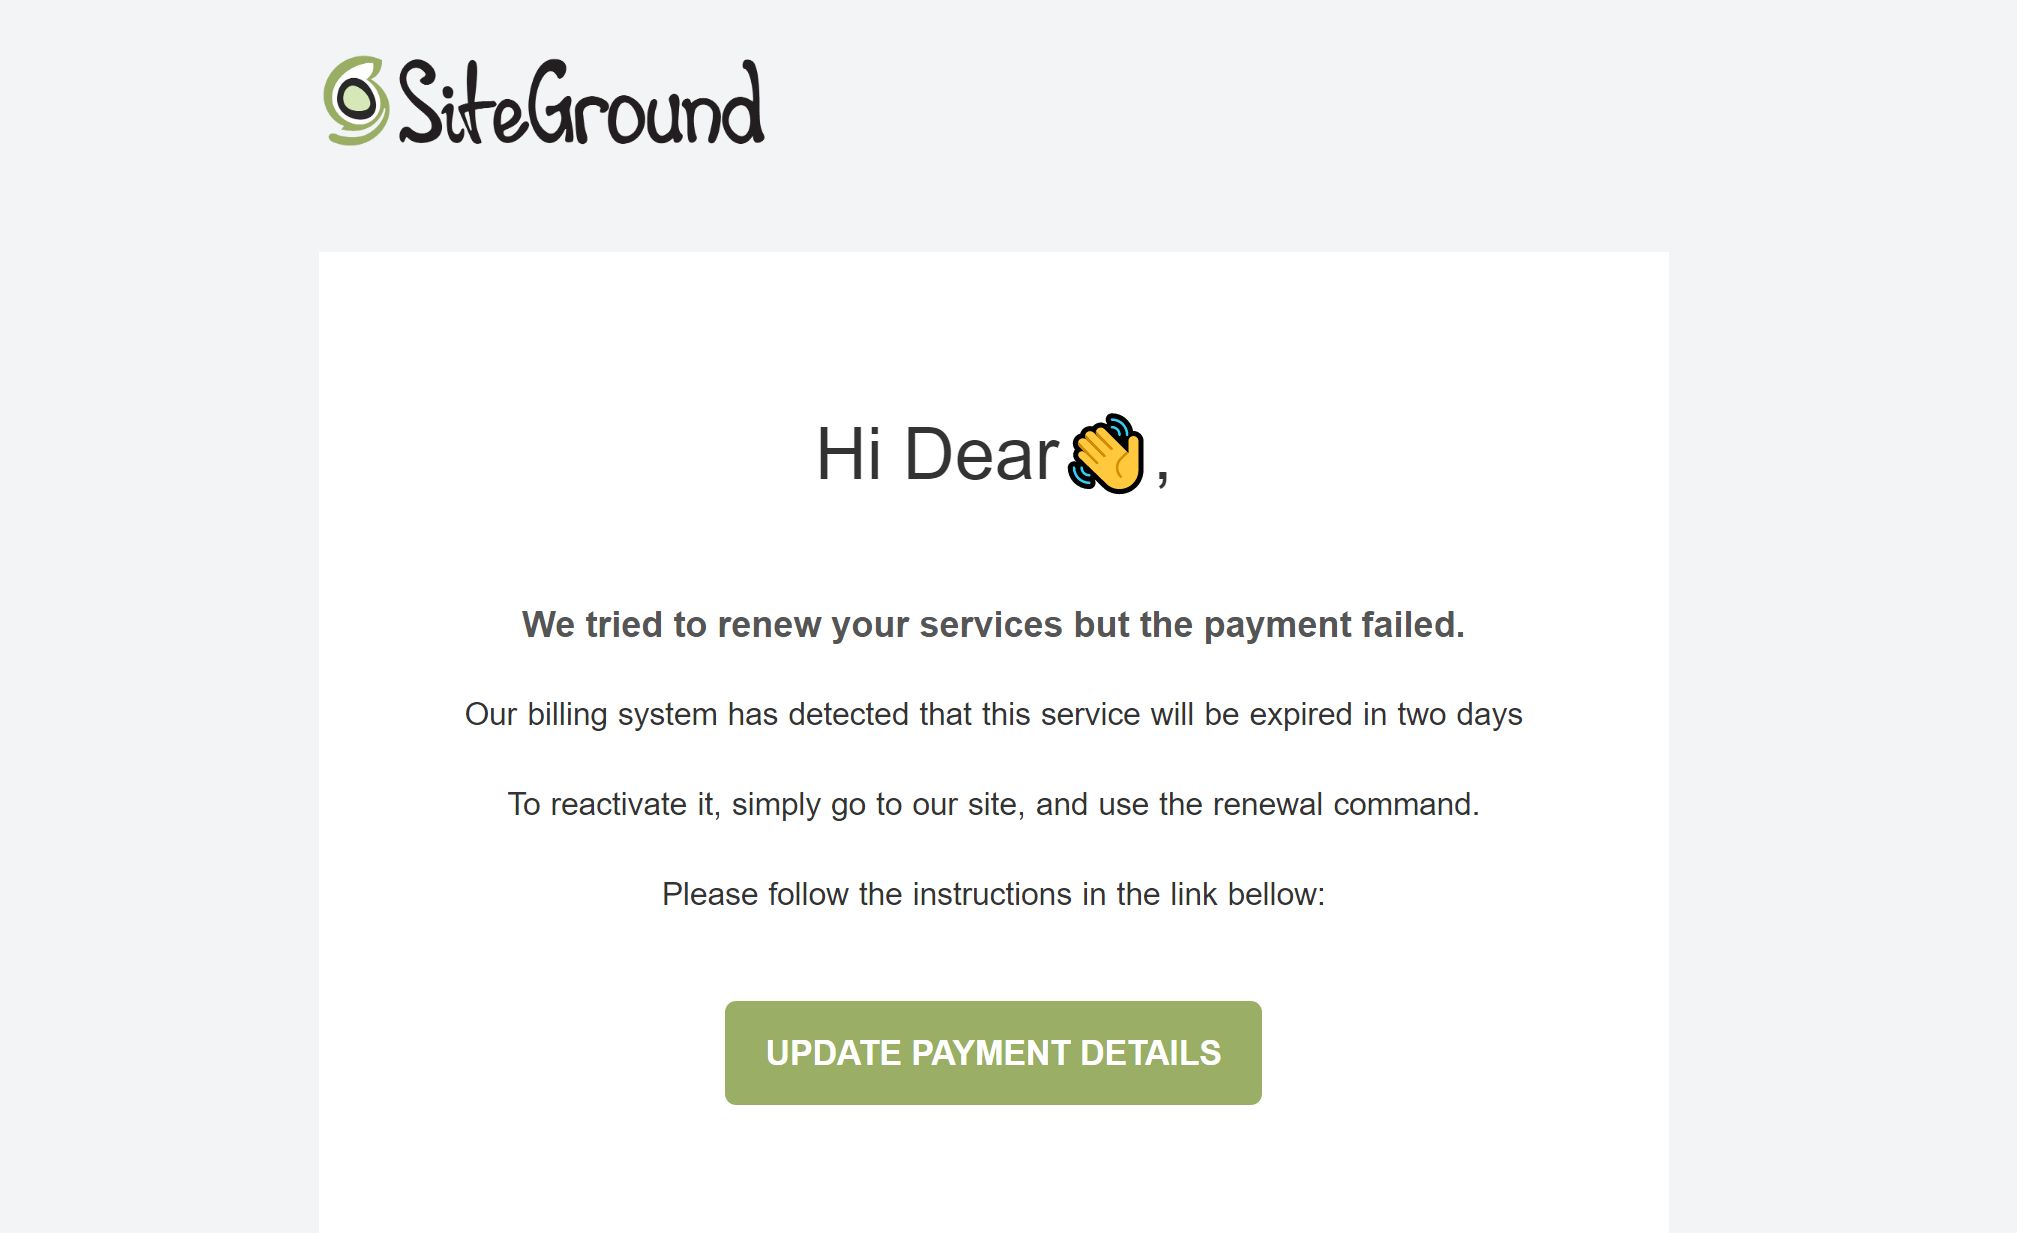
What do good phishing emails look like? Here are a few examples of actual phishing scam emails sent to SiteGround customers.

Apart from all the red flags already covered above, the ‘from’ email address of these emails is not a valid SiteGround email. What is more, a proper SiteGround email would never mention the payment method used by you to pay for the service in question.

If you’re a SiteGround customer who comes to report such emails, SiteGround would ask you to send the whole email as an attachment, as they use it to train their own systems to block such emails (in case your email is hosted with SiteGround), so that they do not reach your inbox. In case your email is not hosted with SiteGround, you can mark it as spam in your email provider.

To learn more about how to stay safe from phishing email attacks, check out the blog post on this topic.

How Do You Stay Safe from Email Scams During the Holidays?

So how would you tell if this was a scam email? Well the easy answer is to “practice safe email”. Here are a few of the things I do before I click a link on an email, any email.

  1. Check the ‘from’ address.
    We’ve already done this but so very many phishing emails come from implausible email addresses. Most scammers don’t bother to try and hide it because so few people pay attention. A recent phishing attempt sent to me purported to come from NetFlix. However, the email address was XXX@yahoo.jp. Yes, Yahoo has a Japan domain but they don’t send email for NetFlix from it! Not even to Japanese customers.

    A good rule of thumb is if you were not expecting an email from someone, even a family member or friend, treat it as suspicious until you know it was actually from them. If you don’t recognize the person it came from, then automatically assume it is malicious until you can prove otherwise. 
  2. Check all links before clicking.
    Most email clients these days will let you hover over a link that says “Click Here” (or wherever) and see what the actual URL is. Read it VERY CAREFULLY. Pay attention to the domain name. https://goog.le is not the same as https://google.com. Read it carefully. If it looks suspicious, do not click it.

    Some email programs will show you the link in a popup when you click it and ask for verification before it actually opens a browser to that link. If your email program will do this, by all means turn this feature on. Yes, it adds an extra step before you can see that precious baby picture your friend sent you, but it allows you to make sure that you are actually going to see a baby picture and not install malware on your computer.
  3. Do not automatically download attachments
    Your email program should be set to not automatically download attachments. This means that if you download something from an email, you will have to do it on purpose. If the email doesn’t seem right or fails any of the checks we’ve discussed here, don’t download anything. Even things like Microsoft Word documents which seem innocuous (click here to see the invoice for the service you didn’t order) can do malicious things if you open them. If you weren’t expecting someone to send you an email attachment, don’t open it!
  4. Read The Headers
    Ok, this is for the hardcore email nerds out there but those of us who have been doing this a while can discover a lot by reading the headers that come with every email. These days email programs hide the headers from you but they are there if you want to read them. 
  5. Listen to your gut
    My wife, The lovely and talented Kathy, got an email from our worship pastor one day with the subject line “I love you”. She was good friends with this man and while the subject line confused her, it also piqued her interest. She opened it only to find that there was a malicious script attached to the email. It deleted about ½ of the images we had stored on our home server before I could stop it. Thankfully, I had a backup so there was no loss, other than the hours it took to clean up the mess. Had she simply called him, opened a new email and written him at the address she had in her contacts list, or contacted him in any of a half-dozen other ways, she could have found out that it was not from him but was a scam. Instead of trusting her gut, she opened the email.

Other Black Friday Scams To Be Aware Of

Email is by far the easiest way for bad actors to get unsuspecting people to do bad things. However, there are a couple of other ways.

If you get an email with a link to goog.le, it’s easy enough to spot. However, if you are doing your shopping at https://reallyLongDomainName.com and you misspell it or “fat finger” it (typo), then you might end up at a site that looks exactly like the one you were aiming for.

Bad actors look for common misspellings for profitable domains. They buy them up and put copycat sites up. These are sites that look just like the one you were looking for. They probably even have products and a shopping cart. However, make no mistake, they are scams. When you put in your personal information and credit card number, you are not going to get those purple widgets you ordered that your sister will just love. You won’t get anything but a nasty surprise when your credit card statement arrives.

This is really easy to thwart, if you pay attention.

First, after you arrive at a site, look at the address bar. Is there a little lock next to the domain name?

The little lock means that the domain you are using has a secure certificate and that it is valid. If you don’t have a little lock, or if there is a line through it, that means that either the certificate does not exist, or that it is invalid for that domain. Both of those are really big red flags that you don’t want to do any business on this site or put in any of your personal information.

A SSL certificate isn’t always enough to prove that you are on the right website. Scammers can register sitegroound.com, for example, and install a certificate on it. The certificate just provides encryption in most cases. It’s always a good idea to also double check the URL address, especially when you make payments, create accounts, fill out forms, etc.

Sites impersonating landing or login pages

The final type of website scam we’ll talk about are fake login pages. These might be part of a very good looking fake, or you might arrive at a site only to find that before you can get to the good stuff, you have to enter your login credentials. If this is an ecommerce vendor you normally do business with, or an institution you bank with, stop. Don’t do anything else. Sites like that don’t just put up a login page without letting everyone know well in advance. These are nothing more than “password collectors”. 

If you do enter your credentials into the site, they won’t work…because they are fake. But humans are stubborn. You will assume that you mis-typed something…especially if you are using a long and very secure password. So you’ll try again.

If you are like most of us, when it doesn’t work the second time, you will assume that you’ve used the wrong password and you’ll try another password, and another, and maybe even a 4th one before starting to think that something may be wrong.

Every set of credentials you entered have gone into a database and bad people will start using them to try and sign in to any site they think you may have an account on. Since you were giving them real login credentials, you’ve given away the keys to the kingdom.

Be watchful, be alert, be suspicious bordering on paranoid. Make sure before you put any information into a website, you are absolutely sure you are at the right website. Looks can be deceiving.

How to Practice Safe Internetting This Holiday Season

  1. Always be suspicious of unknown or unexpected emails.
    If you don’t know the person, or even if you do know them but aren’t expecting to hear from them, be suspicious. Yes, your long lost aunt may be contacting you via email with a hotmail.com email address to tell you that she’s leaving you her entire fortune when she dies and she needs you to sign the will, but chances are really good that it might NOT be her. Verify before you take any action.
  2. Don’t click a link in an email until you are absolutely sure you know where it is going and what is going to happen.
  3. Don’t provide your personal information to any site unless you are positive and you know that it is the site you think it is. If you don’t think you are on the right site, close the browser immediately.
  4. Whenever possible, use a Virtual Private Network (VPN) from a reputable provider.
    I won’t name my Internet provider but I will say that I do not trust them. They have been known to make it easy for bad people to watch the traffic going across their network and pull out information as they see it. These days almost all websites use encryption to make sure that’s not easily done, but it is still possible for people with enough time, money, and determination. So whenever possible, I use a VPN to encrypt my traffic even further.

    VPN software isn’t expensive these days, as a matter of fact, if you are a “computer person” you can download, configure, and run your own. I don’t recommend that as it’s easy to get it wrong, but I’ll admit to having done that in the past. These days, I use a commercial VPN that comes with my virus protection. Now, my neighbor can’t see any of my traffic because I’ve got an encrypted tunnel between my network and a server in Miami, FL, USA. (I can choose from about 50)
  5. Don’t use the same password on any 2 websites
    Look, I know how hard this is. It’s difficult to come up with one secure password that you can remember, let alone the 20-30 you need to make sure every site is different. I suggest using a password manager from a reputable software company. There are a few of them out there. The one I use works on Windows, Mac, iOS, iPadOS, and Android. So, no matter where I am at, my passwords are with me. All my passwords on all major sites are long, random, and unique. If you know one of them, you can’t get into anything but that one service I use it for.

Wrap-up

Stay safe out there this holiday season. Have fun, enjoy the company of family, and if you get an email from me saying that Bill Gates is giving 1 Bitcoin to each person that forwards this email…well, you get the idea.

[subscribe_cta]

Build in Security from Day 1 to Prevent Website Hacks

website hacks prevention

Website security should be on the mind of every site owner. It doesn’t matter if your site is large or small – if it is important to your business, you need to keep it safe and secure. As a site owner myself – and primarily a WordPress site owner – I’ve come up with a checklist I go through every time I spin up a new website for myself or a client. Let me share it with you in hopes that you will pick up a few new ideas. Let’s look at what it takes to secure a website.

Choosing A Secure Web Host

It should go without saying, but security starts with your web hosting company. I’ve used everything from ‘do it yourself web hosting’ to ‘concierge level hosting’. The trick is to find the level you need and the support you are comfortable with.

Check their support

The first thing I do when considering a new web host is to check their support and response time. I’ll sign up for a free trial, put up a site, and then ping support to ask a question. How quickly they respond and how well they understand the question gives me clues as to what I can expect from them if I host with them.

Check their security features

I’ll then check their website and hosting plans to see what security tools and features they provide. I’ll look for essential things like an SSL certificate to encrypt and protect my website data, domain privacy to hide my personal information from public Whois databases, 2-factor authentication to protect my website from unauthorized access, geographically distributed backups to have a safe copy of my website in case something goes wrong.

Other key security measures I’d like my website hosting provider to have in place is a Web Application Firewall – software that sits in front of my website and protects it from known bad traffic – to keep my host server safe from software exploits, DDOS and brute-force attacks protection, and the option for automatic updates to the latest PHP and WordPress versions to keep your site secure from malware.


If the host provides yet more security tools, that would be even better. For example, on top of all these features, available on the SiteGround platform, they also offer an in-house developed Site Scanner service and a free in-house built SiteGround WordPress Security plugin to make sure that your website would be as secure as possible.

Check their blog

Step 3 when selecting a web host is always to read the last 5 entries in their blog. 

  • Are they recent?
  • Do they talk about security?
  • Do the blog posts seem helpful?

No, not all blog posts are going to be about security, but I’d better be able to find a recent one. The Security landscape changes quickly so they need to be posting regularly.

Check their price

Finally, I check their pricing tiers and figure out where my site will fall. Price is the last thing I check because if the first two boxes aren’t checked then the price doesn’t matter. They could be giving it away for free and I wouldn’t use them.

Build Your Site Securely From The Beginning

Once you’ve laid a secure foundation for your website, it’s time to start framing it and building it out. At every step, you need to make sure that security is “baked in” not “bolted on”.

Security is baked in when you think about it before you start building your website

Security is bolted on when you build out your entire website and then decide to just add a security-focused plugin to cover your bases.

Baked in is always better.

What does it mean to bake in security?

Install an SSL certificate as soon as you get the website set up

Don’t wait until you are ready to deploy your website before you remember to install your SSL certificate. These days a secure website is just a few clicks away. Take the time to do it now and then make sure you force all traffic to be https after it is installed. For those users hosting with SiteGround, your Site Tools makes setting up and enforcing SSL easy. Just a few clicks and you are in business.

Set a strong password policy before you start adding users

Passwords are the lock on the front door to your site. When building out your site, put a strong lock on the front door by requiring all users to use strong passwords. Doing this before you let users start coming into your site will make sure that no users set up weak passwords.

Require Two-Factor Authentication (2FA) for any user that will have admin-level rights in the system.

Two Factor Authentication is the deadbolt on the inner office of your site. Yes, a strong password is important for anyone to get into the site, but to get to things like financial information or user management, you want a strong deadbolt as well. Keep your system secure by implementing 2FA for all your admins. The SiteGround Security plugin makes setting up 2FA very easy.

Set up a backup system that will regularly backup your entire website and store those backups securely.

You need a 30-day backup system implemented from day 1. Not 1 day, not 7 days, 30 days. The reason is, that if your site gets hacked, you may not notice immediately. Once you do notice, you want to clean your site and one of the best ways to do that is to restore your site from a clean backup. 

SiteGround’s Site Tools provides an intuitive tool for scheduling nightly backups and restoring from them when needed. 

While we are talking about backups. Don’t forget to force a backup before any upgrade, major site redesign, or installing a new plugin. It never hurts to have a fresh backup in case things go bad.

Adhere To The Principle Of Least Privilege

Before you start letting users into your system, think about the roles that they will play. A role is a set of permissions or privileges and you want to give each user the absolute minimum level of privilege they need to use your site.

There are several good role editors for WordPress and I suggest you install one, learn how to use it, and then audit the roles you have in your site to make sure they have only those privileges they need to use your site. 

On a regular basis – at the very least once a year – review these privileges to make sure they are still valid and to make sure that no role has been granted a privilege it does not need. 

Most users are not trying to do bad things, but we have to assume they would if they could. Adhering to the Principle of Least Privilege will help make sure that bad actors, or curious users, can’t do things to your site they aren’t supposed to.

Only Use Software From A Trusted Source

In software development – as in building a house – your supplier’s reputation is critical to your project’s success. If you use a cut-rate supplier for the framing materials of your house, the entire project will suffer. Worse yet, it will cost you more later on to fix these problems than it would to just buy good materials to begin with.

Building your website with quality materials like plugins and themes from reputable vendors will usually cost you money in the short run. However, knowing that you have companies standing behind their products and updating them when issues arise is worth the money.

Yes, you can choose a free plugin or theme to build a critical feature of your website. However, what do you do if you discover that there is a security flaw? Worse yet, what do you do when you discover that flaw and then discover that the author has abandoned the project? At that point you have 2 options, neither good.

  1. Hire a developer to fix the security flaw
  2. Rip out the plugin, find another one that does the same thing, implement it and make any changes to your process that are necessary.

Both of these can be expensive propositions that could be avoided by simply choosing wisely in the beginning.

SiteGround recently looked at the data from a lot of compromised websites. What they found was that the majority of the compromised websites were compromised because they had unpatched plugins that had security flaws in them. Much of the time these were the free versions of paid plugins downloaded from untrustworthy sources. Only download plugins and themes from trusted sites like WordPress.org or vendors you trust.

The WordPress plugin repo is a reputable source. WordPress.org has implemented a review process – both human and scanning software – to help filter out plugins that have potential security issues or otherwise violate WordPress policy.

Scan Your Site Regularly

Just like you build a security system into your house, you want to set up a security scanner for your website as soon as you build it. Security scanners look at your site both internally and externally to make sure that there are no known vulnerabilities. It will check your website for viruses as well. No security scanner is perfect, just like no home security system is perfect. But your website is more secure with one.

A good scanner will look for things like cross-site scripting vulnerabilities among other things. These vulnerabilities can allow your site to be used in the attack of other sites or attacks on the end user themselves.

SiteGround has a great scanning system available. I get regular emails from it telling me which sites it has scanned and either that they are all clear or that there is an issue I need to address…immediately.

Once you’ve built a new house, you don’t hand out keys to anyone who asks, even if they claim to have a good reason for wanting in. Similarly, you want to make sure that if you get an email that says it is from your site, you don’t automatically click on the link.

You should know every email your system is capable of sending. When you get one that you don’t remember setting up, you need to investigate. Don’t click, start looking at it. Check the headers, look at the exact URL any links go to. Most importantly, quarantine the email using your virus detection software. 

Unknown emails purporting to come from your site are just another way that bad actors try to get into your site. These phishing attacks come from servers that are not under your control, so you can’t stop them. You can, however, be aware so that when you get them, you delete them. In almost all cases, if you don’t click, the email itself can’t do any damage.

Tools I Regularly Use To Bake Security Into My Sites

Keeping a WordPress website secure doesn’t have to be a full-time job if you bake security into it from the beginning. To do this, there are a couple of tools I use on almost every WordPress website I have.

The SiteGround Security Plugin is the first plugin I install on any new website I spin up. I install it, I install an SSL certificate, and I configure everything to be secure before I do anything else. If I get this part right, everything else is easier. 

The SiteGround Optimizer plugin is a great way to make my site faster, but it is also where I check the “HTTPS Enforce” checkbox. This way all the traffic on my site goes over HTTPS even if it wasn’t originally. Having an SSL certificate is important, enforcing it on all traffic is equally important. 

SiteGround’s Site Tools have a lot of great options to make managing a website easy. The one tool I use in setting things up though is the Backup tool. After I get SiteGround Security and SiteGround Optimizer setup and configured, I have my foundation laid – I force a backup. This is my fallback in case I mess something up while building out my site. 

Then before I install each plugin or theme, I create a new one. I name these backups “BEFORE “ + the plugin or theme name. This way I can roll back to any point in the process.

Wrap Up

If you lay a secure foundation for your website and then think about security at every turn, then you can rest easy at night, knowing that your site is as secure as possible. No website, however, is bulletproof. Therefore, the last step is to build your Disaster Recovery plan. What steps do you take when your site has been hacked?

The SiteGround Security plugin has a series of steps you can take just for that situation. It is not a complete disaster recovery plan but when you combine it with 30 days of backups, you are well on your way to having one.

[subscribe_cta]
All You Need to Know On WordPress User Roles And Capabilities To Manage Them Wisely

As WordPress has grown in popularity, application, and complexity, we have all discovered something very important, making everyone an administrator isn’t a winning strategy. Thankfully WordPress provides us with a very powerful tool called User Roles and Capabilities that helps us give people just the capabilities they need without giving them too much or too little. This helps us keep our sites secure. 

In this article we will talk about:

What Are WordPress User Roles

As sites become bigger and more complex it takes more people to manage and maintain them. 

Yes, sites still need:

  • Authors to write new content that makes people’s lives better.
  • Editors to fix all the mistakes in the authors contents
  • Administrators to keep everything upgraded and working smoothly
  • Contributors to assist editors in editing posts
  • Subscribers who may or may not have paid us money but they have at least registered with us and given us an email address. (that’s worth something right there)

But these days sites also need:

  • Warehouse staff to log in, print labels, and ship products.
  • Accounting staff to make sure we collect all the money that is owed to us.
  • Social Media managers who can see behind the scenes, but not necessarily change things.
  • Community Members who have paid a premium subscription to access the really good stuff the authors are writing and editors are editing
  • And of course…premium community members who can log in and access the really REALLY good stuff we save for those special few who see our vision and subscribe at the premium level.

The list of needed WordPress user roles is endless. It changes with every site because each site’s needs are different.

The Main Types of WordPress User Roles And Their Capabilities

A WordPress User Role is a collection of capabilities. A capability is a permission to do something. The standard WordPress install comes with around 40 capabilities, as well as with 6 user roles by default, ordered by level of power over those capabilities:

Administrator:

The default administrator role (not to be confused with the administrator account…that you should not have on your site. If you do have one, stop and watch this video) has all of the standard capabilities.

What can a WordPress administrator do?

In a regular WordPress site, there is nothing that the administrator role cannot do, such as:

  • Create or delete users & manage their permissions
  • Customize WP dashboard
  • Update the WP core, themes and plugins
  • Edit and manage posts and categories
  • Upload files
  • Moderate comments
  • …and a lot more.
Who should get the Administrator role?

The administrator role should be reserved for the person that is responsible for the technical aspects of the site. If you don’t manage the security of the site, update plugins, and handle problems, you probably don’t need to be an administrator.

For safety sake, I always create a separate account that I use on my sites as the administrator. My normal account – the one I use to post content and manage users –  is an editor. Therefore, I have to make a conscious decision to log in to do administrator things. 

My administrator level accounts all have Two Factor Authentication enabled (see below) and have very strong passwords.

Things get a little more complicated if you are running a WordPress Multisite, because the admins user capabilities are limited for these types of sites. For this, there is a bonus WordPress user role in WordPress, the Super-Admin role.

Editor:

The editor manages things. The account I normally log into my sites with is an editor. I can do everything except manage plugins, themes, and other technical things that require some serious thought before doing. Having my day-to-day account be an editor keeps me from accidentally disabling or deleting a plugin or theme.

Who should get the Editor role?

Anyone who is managing things on your site (content, users, etc.) is a candidate for being an editor

Don’t be fooled by the role name, editor is still a very powerful role and in the wrong hands can cause serious damage to your site. Seriously consider enabling Two Factor Authentication on editors and enforcing strong passwords to keep these accounts safe.

Author:

Next is the author role. The author role is a much more limited role. Out of the box, basically an author can: upload files and create, edit, publish or delete his own posts.

Who should get the Author role?

The author role is great for guest posters on a blog or regular authors whose only function is to write and edit content.

Subscriber:

A subscriber is a guest that has registered with your site. They have no capabilities other than to be able to read content and edit their information

Some sites have content that is not visible to users unless they register. The subscriber is a good role to use for that. You will need a plugin to be able to hide content from users who are not of a given role or higher, but those are easy to find in the WordPress Plugin Repository.

Other Roles:

Many plugins you install like WooCommerce will add new roles and new capabilities to WordPress automatically. For instance, When you install WooCommerce, it adds the role “Customer”. A Customer has certain capabilities that mainly deal with them being able to view and change their own data, view their roles, etc. People are moved into the “Customer” role when they purchase something and set up an account on your site.

How to Assign WordPress User Roles to Your Site Users

WordPress does not come with a built in-role and capability editor (more on that below). You can however assign your users to different roles. There are two ways to do that with a standard WordPress install.

1. Manually

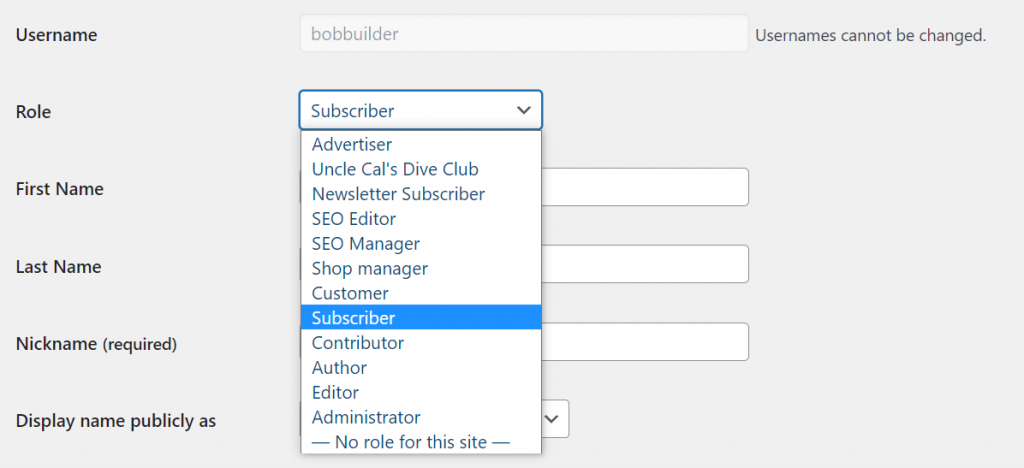
For each user on your site, you can bring them up in the User Editor and select the role you want them to have.

In the above screenshot, I have selected Subscriber for my site member Bob the Builder. You can assign – and re-assign – roles as often as you like.

2. Automatically

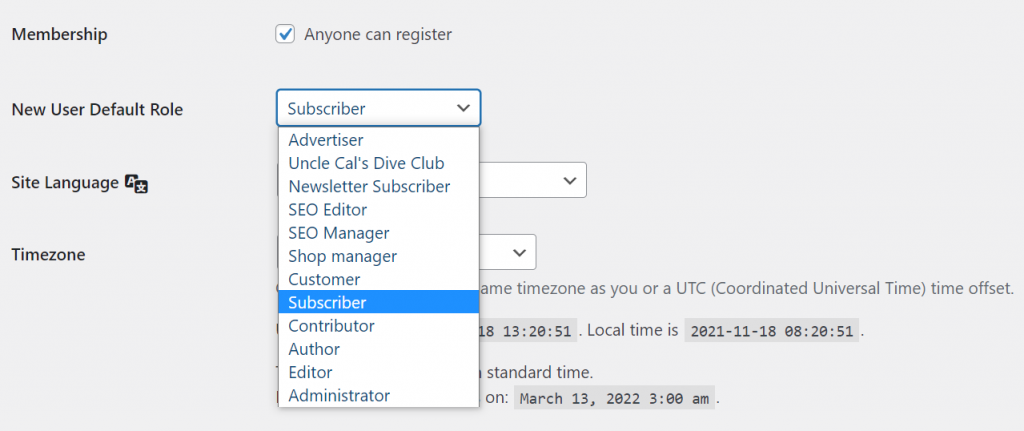
Using an account with the role of Administrator, you can go into the WordPress Admin Dashboard and select Settings > General. There you will find a drop down that allows you to decide what role users will be assigned automatically when they register with your site. This defaults to “Subscriber” but you can set it to any role you like.

How to Manage and Edit WordPress User Roles and Their Capabilities 

As I said, almost all of the capabilities are reserved for the administrator, that doesn’t mean you can’t change things around. There are times when you may want your contributors to be able to moderate comments, a capability usually reserved for Editors. WordPress is flexible enough to allow you to move capabilities around and even create new roles. 

Out of the box, there is no good way to look at what roles and capabilities are set up in WordPress nor create new ones. If you are a programmer, you can of course write code to show them to you and even write code that will create new ones. Where’s the fun in that though? 

Like everything in WordPress, the easy way to manage roles and capabilities is to install a plugin. Also, like everything in WordPress, there are a lot of good plugins to choose from that will help you see, manage, and create user roles and capabilities.

Because there are so many plugins out there, I can’t tell you which one is best. I can, however, tell you which one I use. I use User Role Editor by Vladimir Garagulya and have for a while now. 

The biggest reason I chose this particular plugin is that it does the job. The second biggest reason I chose it was because it’s free and I am cheap. When I say free, I mean that I use the free version. Vladimir has several options out there for those who want the advanced features and this code is well worth the money.

How to Manage WordPress User Roles With User Role Editor

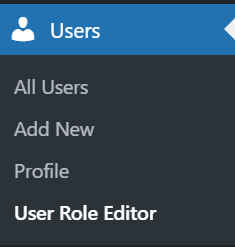
After installing User Role Editor, you will probably notice that it didn’t add yet another menu item to your left sidebar. Instead, it adds a sub-menu item to the “Users” menu, “User Role Editor”.

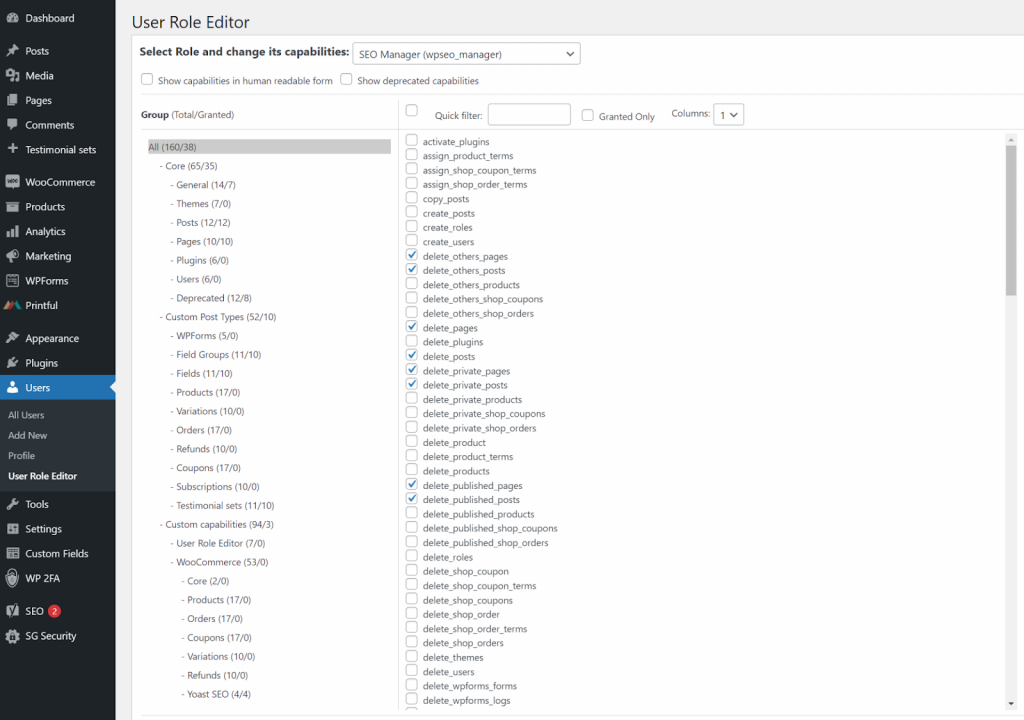
Click on that and you get a complete list of all the capabilities currently in use on your system.

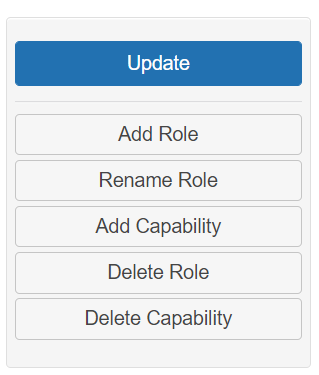
On the right side of the list are a series of buttons that allow you to add new roles and capabilities.

The screen layout can be a little confusing at first. However, once you begin to poke around and see how things are laid out, you begin to get the feel for it.

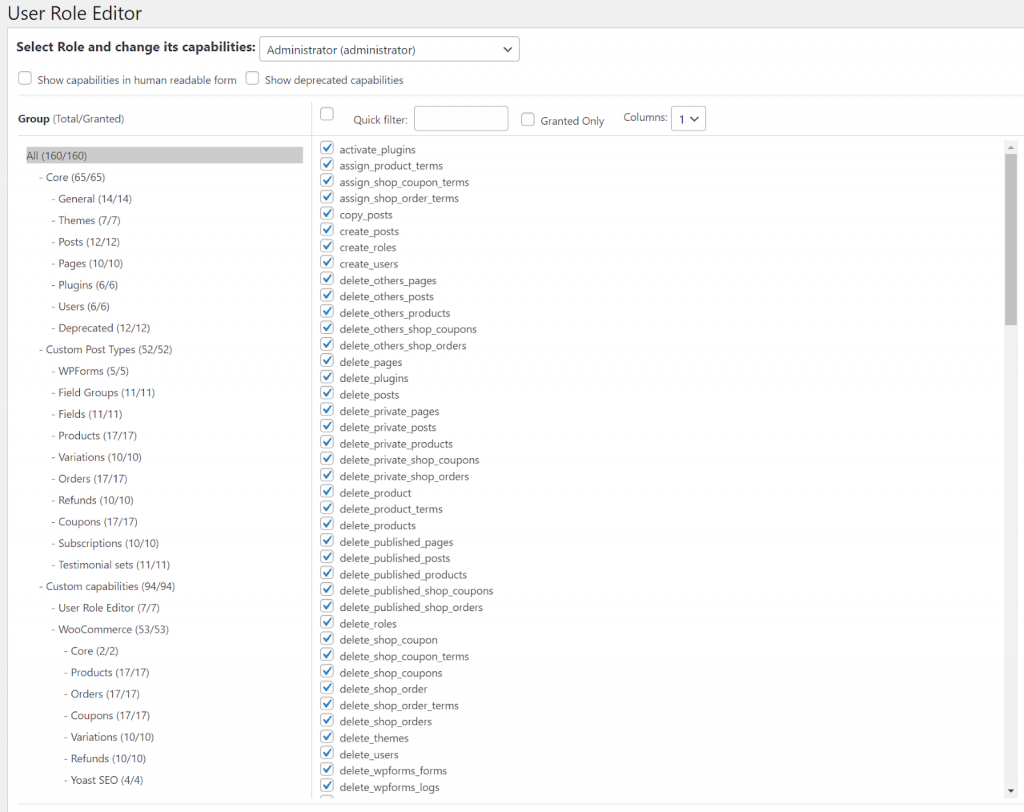
As you can see, if you select the “Administrator” role in the dropdown at the top of the screen, it shows you all the capabilities that the Administrator role has access to. (Hint: All of them)

The tree on the left is how the capabilities are broken down and organized. This way you don’t have to scroll through the entire list to find that one you want to turn on or off.

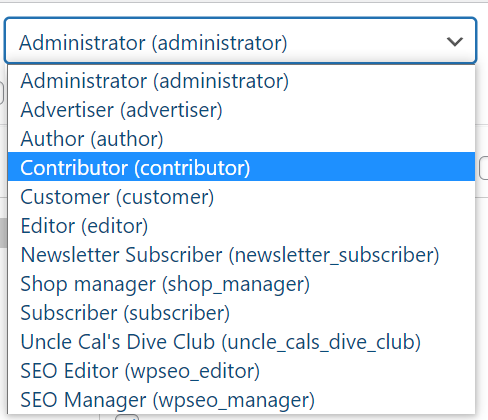
To use the example I used above, if I want my contributors to be able to moderate comments, the first thing I do is select “Contributor” from the list of roles.

Once selected, I see that almost all of the checkboxes disappear. On the tree on the left, each category gives me 2 numbers, the number of capabilities in that category and the number of capabilities this role has in that category. In the case of “Contributor” most of the second number are 0.

Using the tree on the left, we can select “Posts” to find the moderate comments capabilities.

To grant our contributors the ability to moderate comments we just check the box and click “Update” on the right. 

That’s all there is to it. Now any person who logs in and is a “Contributor” will have the ability to moderate comments on posts.

That gives you a feel for how easy it is to manage existing user roles and capabilities.

How to Create New WordPress User Roles and Capabilities With User Role Editor

What about new Roles and Capabilities? Are those as easy? Yes, they are.

On the right, click “Add Role” and follow the prompts.

If your new role is similar to an existing role, it even gives you the ability to clone an existing role to save time. Then you can simply change the capabilities of your new role to suit your needs.

New Capabilities on the other hand are a little more difficult. Yes, you can define them in the interface but unless there is code written to use the new capabilities they won’t have any effect. Before you start adding capabilities, talk to your programmer.

WordPress User Roles Security

So as you’ve seen it’s really easy to add new roles and customize them to fit your needs. Just because it’s easy though doesn’t mean you should add a bunch of them willy-nilly. Before you start, sit down and decide why a new role is necessary. What will this new role be able to do or not do that is different from existing roles. The more roles you add, the more you have to manage.

Also, there are 2 things you can do for better WordPress security in terms of user roles:

Apply The Principle of Least Privilege

Once you have decided to add a new role into your system make sure you adhere to the Principle of Least Privilege. When creating roles, less is more. Only give your new roles the minimum capabilities they need to fulfil their role. If you are setting up an accounting role, don’t give them the capability to Delete Posts. Stick with the minimum, you can always add later if you need to.

Implement Two Factor Authentication (2FA)

For every new role you setup that has significant permissions, make sure you setup and enforce Two Factor Authentication for those roles. 

If the Administrator role is the only significantly powerful role you have, then the SiteGround Security Plugin is a great option. It makes setting up 2FA for the Admin Role very simple. Here is a demo on how it works.

If you have other roles that have significant power or can see Personally Identifiable Information (PII) for other users, make sure they have 2FA enforced as well. There are several good (free) 2FA plugins out there that can help you do that.

Wrap Up

WordPress has a power user role and capability system that is flexible enough to meet almost any site’s needs. Like any powerful tool though, you can do damage to your site. You can lock users out of capabilities they need to access the site or give users the power to do bad things.

Before you start, stop, think, and then act. That is the winning strategy for managing user roles and capabilities in WordPress.

[subscribe_cta]

The Best WordPress Backup Practices, Solutions and Plugins

For as long as there have been WordPress, site owners, managers, and developers have worried about how to backup WordPress. Even in the early days, WordPress was a complex system. It could do a lot, but backing it up and restoring it took time, patience, and of course, developers.

Still savvy site owners understood that it was worth the effort to back their sites up. Natural disasters, bad actors, and backhoes were all the enemy of web sites, and without a good disaster recovery program, you could lose everything.

In the early days my absolute favorite solution was a plugin that simply backed up my database each night using mysqldump and then emailed it to me. I thought this was the end-all/be-all of backup solutions. It was easy, it was off-site, and I had an email rule that deleted them so in 300 days, they were gone.

The problem that is obvious now is that my database, while important, is only part of what needs to be backed up.

I do not believe that there is a single best backup plugin for WordPress or solution. I believe that different types of sites have different needs and that WordPress site owners should evaluate their needs and options and pick the best solution for them.

That having been said, any WordPress backup solution is better than no solution at all. If you aren’t backing up your WordPress based website on a daily basis, read the rest of this article, pick a solution, and start backing your site up today.

The Best Solution to Back Up Your WordPress Site Without a Plugin

Backing up WordPress via your hosting partner

Most top-tier web hosts offer backup services as part of their monthly fee. This is going to be a little different than a plugin solution because your web hosting partner has access to the underlying infrastructure and can do things that plugins simply can’t do.

Your hosting partner backup solution will almost always operate faster in both backing up and restoring because they don’t rely on WordPress to do the heavy lifting. This means that if you have a large site or large database, backing up and restoring via your web hosting partner means less down-time.

One thing to look out for when utilizing your web hosts backup and restore is to make sure that the backups are stored off-site. This means not on the same server that your site is stored on and hopefully not even in the same geographic region. 

Heaven forbid that a natural disaster hit the region your site is hosted in and the entire infrastructure is out for an extended time. If your backups are also stored there then you are down for the count.

At SiteGround they are aware of that. They create daily backups of your website, make them available on a rolling 30 day basis, and they geographically distribute your backups to better ensure your data is stored safely.

Expert Tip: Just because you are utilizing your web hosting partner’s backup service doesn’t mean that you don’t still have a responsibility to keep a backup of your site locally. If no automated service is available, log in once a month and download the last backup of the month to your local computer as an absolute last resort.

How to Back Up Your Website with a WordPress Plugin

Take in mind these 2 questions by the time you will need to choose a WordPress backup plugin that best fits your needs.

What should a WordPress backup plugin back up?

A good WordPress backup plugin or solution backs up at the very minimum 2 things.

  1. Your database
  2. Your uploads directory

In addition, you may also want to back up:

  1. WordPress Core
  2. Your Themes
  3. Your Plugins

The reason I don’t list these in the must-backup section is that these can usually be downloaded and installed thus you don’t technically need to back them up. Still, it’s a good idea to include these in your backup because it makes restoring a site much easier.

What should a WordPress backup plugin do?

A good backup solution should cover at least these three points.

  1. Backup your site
  2. Store the backup in a different location. In tech, we call this “off-site”. That’s a hold-over term from when we used to back things up on tape and then physically take the tape to a different site. 
  3. Restore your backup. A good backup solution is only 1/2 the problem, you need to be able to USE those backups in case of an emergency. Most plugin based solutions require you to re-install WordPress and their plugin before you can restore. Usually this isn’t a problem, but solutions that are provided by top-tier web hosting providers are better in that they can restore everything.

The Best Backup Plugin for WordPress I’ve Tested

Now that we understand what a backup solution should do, let’s look at the best plugin that I have found for backing up WordPress.

UpdraftPlus

UpdraftPlus is the one I am using on about 70% of my sites and I consider it the best free backup plugin for WordPress. The paid version is even better! 

UpdraftPlus is a “freemium” plugin in that some of the features are free, others cost you money. So far I’ve not needed any of the premium features. That doesn’t mean they aren’t worth the money, UpdraftPlus starts at only $42/year for two sites.

UpdraftPlus doesn’t automatically store your backup off-site. You need to set up where you want them to be stored. If you don’t set up an off-site storage then they are just backed up to your server’s local file storage. I strongly urge you to set up off-site backups.

The good news is that UpdraftPlus will work with dang near anyone when it comes to storing files off-site. 

  • Dropbox
  • Google Drive
  • Amazon S3 (or compatible)
  • UpdraftVault
  • Rackspace Cloud
  • FTP
  • DreamObjects
  • Openstack Swift
  • … and email

My favorite is Amazon S3 and any service that utilizes the Amazon S3 API. Since I already store a lot of things on S3, it was easy for me to set this up and get it running.

Since FTP (and I assume SFTP) is on the list, you can use UpdraftPlus to store your backups anywhere you have an (S)FTP server. That’s most places these days.

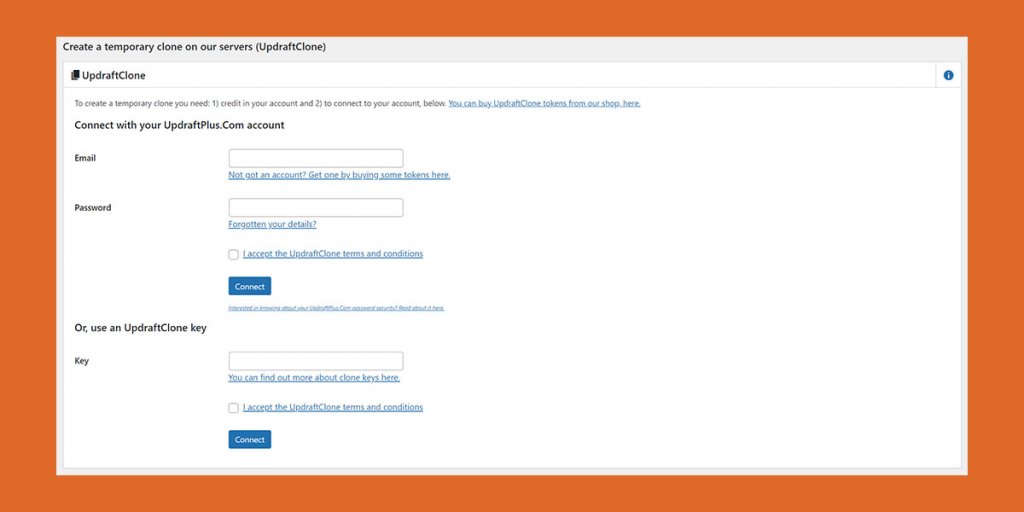
UpdraftPlus can be used to migrate sites as well. Each license comes with “Clone Tokens” that you can use to clone a site. 

One of the things I love about UpdraftPlus is that if you are using WP-Optimize by the same company and you have UpdraftPlus installed, before you do any database optimizations or changes, it asks you if you want to back everything up first. I love that they take the time to help me not shoot myself in the foot. 

Restoring a WordPress site via UpdraftPlus is as easy as selecting the menu option and then the backup to restore. 

The plugin will do the rest. Since this requires WordPress and the plugin to already be installed, if you are having to restore from scratch then you will have to install WordPress, install UpdraftPlus, and configure your off-site storage before you can restore the rest of the site. 

Bottom line, as far as plugin backup/restore solutions go, UpdraftPlus is a solid one. It is easy to use and the free version works very well.

Wrap Up

As I said, there is no single best WordPress backup plugin or best WordPress backup solution. The best solution is the one that gives you, the site owner, peace of mind and the ability to get a good night’s sleep because you know you’ve got a backup.

Sometimes that is a paid backup solution, other times it’s a free solution. However, you decide to back up your site, the important thing is that you do backup your WordPress site.

[subscribe_cta]

21 Useful WooCommerce Plugins To Boost Your Woo Store Functionalities Out Of The Box

WooCommerce, built on top of WordPress, is one of the most popular eCommerce platforms on the web. By every metric available, it is the cheapest platform to get started with as it can be installed on any WordPress website and the basic functionality is free.

If the basic functionality is all you need then it is absolutely free. Beyond the basic functionality though, WordPress – like all of WordPress – is extendable via plugins. In all my years of working with WooCommerce I have never been able to just install it and launch. I’ve always had to install a series of WooCommerce plugins

Choosing a Plugin

Price and budget are always a consideration when setting up an eCommerce site but that shouldn’t be the only consideration when selecting plugins. Other things you need to consider when selecting a plugin are:

  • Feature set
  • Developer (or company’s) reputation
  • How current is the code

A plugin that does exactly what you want done but hasn’t been updated in three years or tested with a recent version of WordPress will usually end up costing you more time and money than it is worth. If you are a programmer and have time to spare, yes, you can bring the plugin up-to-date if it is open source. However that means that you are now on the hook to keep it current.

Paid vs. Free WooCommerce Plugins

All WooCommerce plugins fall into two basic categories:

  1. Free WooCommerce plugins
  2. Paid WooCommerce plugins

In all the plugins that we talk about here, I will note whether the plugin is free or commercial. Being the cheap person that I am, I always gravitate towards the free WooCommerce plugins wherever possible. That having been said, if you are going to be making money, you are going to have to spend a little to get the more useful functionality.

The plugins I list here are what I consider to be the top WooCommerce plugins, regardless of whether they are free or commercial. If they happen to be free then that’s a win for everyone.

The Most Useful WooCommerce Plugins

There are a lot of lists of WooCommerce plugins out there on the web. Some of them look like people just went through the plugin directory searching for the word WooCommerce and listed them for you. The plugins I’ve listed here may not be the shiniest or the ones that sparkle and get the most attention. They are however the ones that I have found the most useful in building my WooCommerce sites. I hope you find them useful as well. 

So let’s take a look at my favourite WooCommerce plugins.

A security plugin to keep WooCommerce safe

WordPress and WooCommerce go a long way to ensure your site stays safe and secure but it never hurts to add another layer or two of security. Of course the first layer of security is always making sure you have a hosting partner that is focused on the security of your site. Second though are a series of small steps you can take to make it more difficult for bad actors to get into your site. This plugin solves that problem.

Security Optimizer

Author: SiteGround

Price: Free

This has become only the second plugin I have ever put on my “must install” list. When I am setting up a new WordPress site for myself or for friends, family, or clients, Security Optimizer is always installed. I don’t always use all of the options, but that is one of the things I love about it, everything is optional. I can use one or two features, or I can use them all.

Make sure that your site is as secure as it possibly can be by installing the Security Optimizer plugin. Good news: If you are hosting with SiteGround, this is automatically installed and activated for you when you install WordPress.

If you are hosting with another hosting company, you can still use 100% of the features of the Security Optimizer plugin. It does not require SiteGround hosted sites.

WooCommerce payment plugins

WooCommerce Payments

Author: WooCommerce

Price: Free

WooCommerce is the latest of the payment processors. It’s powered by Stripe as the payment processor, but you do not need to have the Stripe extension on your site nor an existing Stripe account prior to installing and using WooCommerce Payments. This plugin is more tightly integrated into WooCommerce than any of the other payment gateway plugins and it’s a fully integrated solution, meaning that merchants can manage everything to do with payments from one central place – their own site’s WooCommerce dashboard.

It should be noted that one of the biggest selling points of this plugin is that eligible merchants can get almost immediate access to their funds.

WooCommerce Payments also enables Apple Pay and Google Pay.

Stripe Gateway

Author: WooCommerce

Price: Free

If you don’t want to process your money through WooCommerce and then through Stripe, you can use the Stripe plugin. As with WooCommerce Payments, you will need to set up a Stripe account to be able to use this plugin. 

Stripe is a well documented system and a safe bet for anyone who isn’t sure which payment gateway to use.

Paypal Payment

Author: WooCommerce

Price: Free

Paypal is probably the oldest of all the online credit card gateways. Their interface is kind of clunky but it still gets the job done. Because it’s been around so long, it is accepted in a lot of different countries where some of the newer gateways may not yet be available.

If Stripe isn’t available in your area, PayPal is a solid second choice.

Amazon Pay

Author: WooCommerce

Price: Free

A newcomer to WooCommerce, Amazon Pay has been rolling out over the past few years. The upside is that if your customers have an Amazon account, they can pay for your goods and services with that account. Since most customers trust Amazon to keep their information private, this trust is transmitted down to you if you offer Amazon Pay.

Amazon Pay does support subscriptions.

Square for WooCommerce

Author: WooCommerce

Price: Free

If you work in the real world and in cyberspace, Square is a great choice for a payment processor. As far as a normal eCommerce payment gateway goes, Square is as good as any of the rest but they are the only one that also integrate your real-life payments in the same account.

WooCommerce shipping plugins

These days shipping isn’t something that every store owner has to deal with. If you are selling virtual products or information then you probably aren’t shipping anything./ For everyone else there are a few plugins that you are going to have to consider installing.

JetPack

Author: Automattic

Price: Free with commercial options

JetPack has some core functionality that helps with the shipping and tax collection plugins, so, even though it is not technically a shipping plugin, you’ll need it for that purpose. The good news is that as of this writing, you don’t need any of the paid options to get shipping and tax functionality working.

WooCommerce Shipping

Author: WooCommerce

Price: Free

If you are shipping via United States Postal Service or DHL, install this plugin. It gives you the ability to print out labels for your packages for both of those services. 

UPS Shipping Method

Author: WooCommerce

Price: $99/year

This plugin will calculate UPS shipping for you by talking with UPS’s API. It will calculate both domestic (United States) and International shipping for you.

Please note that this plugin requires that you have the PHP extension SimpleXML installed. This extension is installed by default on SiteGround. If you are using another hosting parter, you will need to contact them to make sure it is installed before you can install this plugin.

This plugin calculates shipping rates but does not print labels.

FedEx Shipping Method

Author: WooCommerce

Price: $99/year

Like the UPS plugin, the WooCommerce FedEx Shipping Method plugin allows you to talk to the FedEx API and accurately estimate shipping costs for your customers

Like the UPS plugin, the FedEx plugin requires that you have a PHP extension installed. This one requires the SOAP extension. As with the SimpleXML plugin, this is installed standard on all SiteGround plans. If you are not hosting with SiteGround, make sure and consult your host to make sure this extension is installed before you install the FedEX Shipping Method plugin.

This plugin calculates shipping rates but does not print labels.

Canada Post Shipping Method

Author: WooCommerce

Price: $99/year

If you live in Canada or you ship a product to Canada then you will want the Canada Post Shipping plugin. This calculates shipping costs for your orders using the Canada Post API.

This plugin calculates shipping rates but does not print labels.

Royal Mail Shipping Method

Author: WooCommerce

Price: $99/year

For those in the United Kingdom, you will want the Royal Mail Shipping plugin. This calculates shipping for your orders based on the 2021 posted price guidelines. This plugin does not talk to an API therefore will not affect the speed of your cart pages. (Some API can slow down the display of pages)

Shipment Tracking Plugin

Author: WooCommerce

Price: $59/year

Regardless of what shipping service you use to ship your product to your eager buyers, you want to give them a way to track those orders to their doorstep. The WooCommerce Shipment Tracking Plugin does just that. It supports all of the shipping method plugins we have discussed here plus many others.

WooCommerce plugins to sell different kinds of products 

Since selling things is the actual point of an eCommerce website, let’s look at a few plugins that will help you actually sell subscriptions, event tickets, custom printed items and arrange bookings.

WooCommerce Subscriptions

Author: WooCommerce

Price: $239/year

There are a lot of subscription plugins out there for WordPress. However, if you are using WooCommerce for selling other products, consider the WooCommerce Subscriptions plugin before you look at the others. This plugin is going to be better integrated into your overall solution than anything else out there. 

The WooCommerce Subscriptions plugin will work with all the payment plugins to handle recurring payments, the trickiest part of selling any subscriptions.

WooCommerce Subscriptions will allow you to sell subscriptions to both physical or virtual products. It is good whether you are selling coffee by the month or your monthly newsletter about coffee.

FooEvents

Author: FooEvents

Price: Starting at $139/year

If you are selling tickets to events, using WooCommerce you have several options. I’ve tried most of them at one point or another and off all of them, I like FooEvents the best. FooEvents makes it easy to sell tickets and manage your events. If you are selling tickets to a physical event, you even have the option of a seating chart to sell individual seats.

Event management and ticket sales are not trivial endeavors so I encourage you to look at all your options before making a decision. Make sure though that you include FooEvents in your list of potential solutions.

Printful Integration for WooCommerce

Author: Printful

Price: Free

If you’ve ever wanted to have a store selling custom printed T-Shirts, water bottles, beach towels, etc. Printful is a good place to start. I looked at five different vendors before I selected Printful for my project and have never regretted the decision. Their products are top-notch and their integration with WooCommerce is seamless.

WooCommerce Accommodation Bookings

Author: WooCommerce

Price: Free

The accommodations industry is not one you traditionally think of when you think of setting up a WooCommerce/WordPress eCommerce site. That doesn’t however mean that WooCommerce has left them out. In the category of WooCommerce booking plugins, the standout is WooCommerce Accommodation Bookings. 

You can set things like check-in and check-out times and it allows you to sell by the quantity of nights stayed.

Given the money to be made in this industry, I find it very interesting that WooCommerce currently offers this plugin for free.

Product and cart plugins to help you sell more stuff

Once you have a customer lined up and ready to buy, wouldn’t it be nice to be able to sell them a little more stuff while they are here? These product plugins will help you do just that.

Product Add-Ons

Author: WooCommerce

Price: $59/year

Whether you want to sell personalization or gift-wrapping, this plugin will help you add options to make your sale even more valuable. This is one of the most popular WooCommerce product plugins available for WooCommerce. 

AutomateWoo

Author: WooCommerce

Price: $119/year

If you’ve ever wanted to hire an assistant to help you run your WooCommerce store, you are in luck. AutomateWoo is almost like having an assistant.

AutomateWoo is all about getting things done. 

  • Follow-up Emails
  • Personalized Coupons
  • Text Messaging
  • …and so much more

AutomateWoo allows you to define triggers. These are events that kick off a series of events that you define, called a workflow. A workflow has rules to make sure that the events triggered are the ones you want done, and if they are, then the action you define takes place.

A simple example would be:

TRIGGER: The date changes. (every morning at midnight) 

RULE: Find all the customers whose birthday is today. 

ACTION: Send an email wishing the customer a happy birthday

That’s a very simple one and yours can be much more complex. The thing is, once you define a workflow, it runs until you turn it off. You don’t have to remember to do things, AutomateWoo remembers what you want done and takes care of it for you.

Check out this great plugin and see how easy it is to get an assistant to help you with your store for only $99/year.

WooCommerce Cart Abandonment Recovery

Author: Addify

Price: $79/year

Abandoned carts don’t do anybody any good. Most good merchants will chase after them. After all, if someone took the time to visit your site and show interest in a product, why just let them walk away?

This plugin allows you to configure and automatically send recovery emails. You can add incentives and relevant coupons as well.

Don’t let your customers just walk away, take a look at the Card Abandonment Recovery Plugin for WooCommerce.

WooCommerce coupon plugin to create great deals

Smart Coupons

Author: StoreApps

Price: $129/year

WooCommerce comes with a pretty good system for creating coupons for your store. It is built into the basic core. However, if you need something a little more, check out Smart Coupons by StoreApps, the most popular of WooCommerce coupon plugins available.

It builds on the basic functionality of WooCommerce’s coupon system and allows you to do things like:

  • Offer free shipping
  • Store Credit
  • Gift Certificates

And several other things that make this plugin nice to have.

*Disclaimer: Prices mentioned in this blog post are subject to change. For accurate and up-to-date information on pricing, we strongly recommend checking the official page of the respective plugin.

Wrap Up

WordPress and WooCommerce are a powerful and extendable platform for eCommerce. There are hundreds of plugins out there that will help you sell, track, market, and report. I’ve only scratched the surface here. I’ve tried to narrow my list of plugins presented to you to the ones that will be most useful to you right out of the box. Once you get some experience, you will undoubtedly start to experiment with many of the more complex plugins and systems available to you. 

Good luck and I can’t wait to see what you build!

[subscribe_cta]

Piping Email with PHP and SiteGround

One of the fun things to do with computers is to think outside the box, to use tools for things they aren’t exactly designed for. Email is one of my favorite toys with which to play with. Email is universal, and everyone has it. So when you create a new user for it, everyone can now do that.

What can we make email do that it doesn’t do already? Well, email is a delivery system, so we can use it to not only deliver data of some kind, but also to trigger an event that causes a computer somewhere to do something. If necessary, email can also respond back to you.

In the early days of the web, there were email addresses you could send an email to with a URL in the body. It would retrieve the URL and send you back the copy. Email pre-dated the web on the Internet, so there was a time when people had email but not web browser. This was a great way to get to the web before you got a web browser. The downside was that most email at that time didn’t support images, but this was okay because most webpages at this time didn’t HAVE images. 🙂

I’ve also used email to deliver data and trigger processing. Last year for Mother’s day, I built my mother and mother-in-law digital picture frames based on Raspberry Pis. The front-end media management for these frames is a WordPress site. This gave me a convenient API already built to deliver images to. The problem is that my siblings are not programmers, so I needed an easy way for them to send images to these frames. Email was that easy way.

I created a system that allows them to send a picture via email. Each digital picture frame has an email address, and they can send pictures to it. While WordPress handles all the user management and image processing, SiteGround’s email system allows me to make all of this happen.

The way to do this is called a “pipe” because you are “piping” the contents of an email to a program of your choosing.

I’ll stop here and tell you upfront that if you are not a programmer or at least a very technical user, this is not for you. Programmers can write programs (like I did) to take the input and process it. Technical users may also be able to install programs on their server that will accept the input and do something with it. If you are not in one of these two groups, I suggest you go find a programmer you trust and hire them to help you do this.

In SiteGround, the process is pretty simple. You first create an email address, then you create a filter for that email address. In my case, I created momspictureframe@example.com (not the real email address) in my Site Tools.

Then I went to filters and created a filter for momspictureframe@calevansxample.com.

  • I gave it a name that I could recognize, “Pipe Pictures to Mom’s Frame”.
  • I set the proper condition. I want this filter to trigger any time any email comes to momspictureframe@example.com. So I set it to:
    • IF ANY
      And then, I set it to trigger on the TO email address.
    • TO EQUALS momspictureframe@example.com
  • Finally, I set it to perform actions. In this case, I perform 2 actions.
    • First, “Pipe to a program”
      This is where you need to be a programmer. I wrote the program necessary to process the emails and uploaded it to my SiteGround site. I have to know the exact path and program name for this to work. Even a good programmer is going to have to experiment a little to get this right. Still, once they get it right once, it’s easy to do it again for other pipes.
    • Second, I set a “Discard Message” action.
      Remember that the first thing I did was create an actual email address? This means that unless I do something, emails will actually be stored for this address. Since I never plan to log into the email server to view them, I want it to toss each and every email coming to momspictureframe@example.com after I’ve handed it off to my script for processing. If I wanted to archive the email for future use, I would drop this action.

That’s it. Assuming you have a program handy that will accept the contents of an email and do something, you can now trigger it using a SiteGround email pipe.

Once you understand the power of piping emails to programs, the possibilities are endless. The example I gave you was a simple one but by no means the only one I’ve written. Again, since email is ubiquitous and available on just about any platform, you can open up a whole new world of processing and interactions for your users.

One word of caution, be aware that email is designed to be mostly insecure. You need to build security into your applications to make sure that only the users you want to, can interact with your system. The easy way to do this is to check the sender of the email, but that’s also insecure. If you do this, it should just be one of the checks you do.

[subscribe_cta]

The Hidden Cost of Free

the hidden cost of free

I’ve been involved in the open-source software movement since there was an open-source software movement. Over time I’ve seen the perception of it change. In the beginning, there were a lot of people writing software and contributing because they could. It made them feel good to give to others.

Users of open-source software recognized this gift they were being given and respected it and the talents of those doing the giving. Many users contributed back to their favorite projects by way of code, documentation, advocacy, and sometimes even money.

Over time, things have changed. These days I see more people using open-source software because they think it’s free. They think that because they didn’t have to pay a programmer for their efforts they are getting away free. Sometimes, this is true, sometimes you can install a piece of software and just start generating value from it. WordPress used to be like this.

These days, however, software, even open-source software, is complex. Yes, WordPress used to have the “5-minute install,” and yes, you may actually still be able to install WordPress in 5 minutes. However, if your goal is to do anything more than write your own blog, you are going to need to add a few hours, or days, to that number.

These days software is complicated. WordPress themes used to be pretty simple. Now, they are complex beats with settings pages and many configuration options. Options that, if you aren’t familiar with the theme, can be difficult to navigate.

This is the hidden cost of free. These days, this is the high cost of free.

Many plugins are “free” these days, but they require you to subscribe to their underlying backend service. Technically they are free, but it is still going to cost you. Other plugins offer you a free version but lock the best features until you pay. Again, technically free, but if you want them to do the cool stuff, you are going to have to pay.

Don’t get me wrong, I am not advocating that all software should be free. As someone who earns their living writing code, I strongly advocate paying developers. It’s just that as a non-technical site owner, you have to understand the cost of “free.”

Be prepared to hire someone to help you. In most cases, you will need:

  • A project manager. We used to call these “implementers,” but these days, I think that term has fallen out of favor. This is a technical person but may not be a programmer. They understand WordPress, plugins, and they know how to make them work together to get things done. They also know when a developer is needed and usually know a couple they can call on for help.
  • A designer. You will most definitely need someone who can make your site look good. Bonus points if they are also a User Experience (UX) expert so they can make your site easy to understand and use.
  • A copywriter. (You thought I was going to say developer, didn’t you?) Yes, you are going to need a copywriter — someone who is a wordsmith. You want them to look at every word on your site and make sure that what you are saying is clear and easy for your user to understand.
  • Optionally you may need a developer. If you do, your project manager will know this and should know who to hire. Don’t go around them and hire your niece and put her on the team. Let the experts do the job you hired them to do.

Once you’ve got your site up, it’s still not free. Make sure you are hosting it with a reputable host who understands WordPress. It may come as a surprise to some of you, but I have sites that are not hosted at SiteGround. Some of my WordPress installs are hosted on a virtual server that I manage myself. I understand what needs to be done, and I understand the risks of managing my own server.

The projects I host myself are fringe projects with special requirements that many hosts won’t provide out of the box. While in a technical sense, yes, each additional site I spin up on my virtual server is “free,” it’s also one more thing that I have to worry about. My time is not free so hosting sites on that server turns out to be very expensive.

For all my sites that do not have very special requirements, I use SiteGround. After 25+ years of managing web servers and 15+ years of managing WordPress, I know what I need in a web hosting partner, and SiteGround ticks every box.

Free and Open Source (FOSS) software is awesome. It literally powers the world we live in. But a lot of times, free only applies to the price you pay for the code itself. When you are preparing to launch your next site, factor in more than just the cost of the code. If your site is going to add value to your enterprise, prepare a budget that will let you do it right. Don’t forget the high cost of free.

[subscribe_cta]

What are Brute Force Attacks and Why YOU Don’t Have to Worry About Them

Exactly what is a “brute force” attack on a website? Just the name “brute force” conjures up a bad guy in a cheesy action movie. For most websites, a brute force attack can be very serious.

What is a brute force attack?

A brute force attack is exactly what the name sounds like. There is no deep logic involved in guessing logins or passwords, it’s just a bot that starts with a login of “A” and a password of “A” and works from there. It will patiently try every combination of letters and numbers there is until it finds a login and password that works. When brute force attacks started, that was all there was to it. Over the years, they have gotten more sophisticated, but at the core, it’s just a bot.

These days, you have bot networks that do this. The problem was that brute force attacks from a single computer were real easy to detect and block. So now a network of hundreds or thousands of computers work together to attack your site and guess a login or password.

Also, these days we have “dictionary tables” which are just lists of passwords that have already been used or words that can be combined together to make a password. A bot network can try thousands of times per second to guess a login and password. Your site is only as secure as the weakest password on it.

In addition to dictionary tables, attackers have gotten even smarter. As a site is hacked and all of the user info is pulled down, the logins and passwords for that site are added to the ones to try. They know that a lot of people don’t bother to create different logins and passwords most of the time so a login on one site is probably good on another.

How do you mitigate a brute force attack?

Well, there are 2 answers to this question.

If your website is not hosting with SiteGround

If you are not hosted with SiteGround then you need to start researching security plugins and configuring firewalls. We’ve talked about some of this before in previous blog posts. You will need to:

Install an application firewall and properly configure it.
There are several good plugins in the WordPress plugin repository that will secure your site against brute force attacks and other types of attacks. The top 3-5 are well respected and while I won’t recommend one here, you can probably find one that comes highly recommended and get it implemented. All of the good ones have a monthly fee associated with them but that’s what it takes to protect your site.

Require strong passwords for all users
We’ve talked about passwords before but it bears repeating. Strong passwords are your first line of defense. Your users might not like it but it will keep your site and their data secure.

Require Two-Factor Authentication (2FA) for all logins
2FA mitigates brute force attacks 100% because the login and password are only 2/3 of the login procedure. For the final 1/3, you have to have the person’s phone. That’s a game-ender for brute force attacks.

As with strong passwords though, users usually hate 2FA. You can limit 2FA to admin accounts but if an attacker gets into your site, you are compromised. So you have to decide which is more important and that’s a bad choice to have to make.

Implement a password rotation policy that forces new passwords at least every 90 days
Another one that users hate but is effective in helping prevent brute force attacks is requiring users to reset their passwords. This is another thing that users hate and if you do enough things in the name of security that users hate, you start to lose users. So it’s a tightrope you have to walk.

Bonus tip: Fail2Ban
In addition to all of those, my personal favorite tool is Fail2ban and WP-fail2Ban. Properly configured (and it takes a developer or network admin to properly configure) this combination can be a very powerful tool to prevent a brute force attack. It’s not easy to configure but it is very powerful. Fail2ban is open source and free, the plugin WP Fail2Ban has a pro version that seems to be worth the money.

I don’t usually recommend specific plugins but this one is unique. I have the free version installed on all my blogs that are not hosted on SiteGround and it works wonderfully. I am strongly considering upgrading to the pro version.

WARNING: This plugin requires Fail2ban to be properly installed, configured, and working on your server. Fail2ban itself has a couple of requirements as well. This is not a trivial plugin to get working. If you are not a developer or very familiar with Linux, get help.

If your website is hosted with SiteGround

If your site is hosted with SiteGround, go back to sipping your coffee. SiteGround has a full suite of tools already implemented including AI to detect brute force attacks from bot networks. This doesn’t mean your site is 100% absolutely secure, nobody can get to 100% safe. It does however mean that this is one less thing you have to worry about.

Wrapup

Brute force attacks are well known and well understood. There are tools that you can install that will mitigate the risks of them compromising your site. That having been said, your best bet is a hosting partner like SiteGround that deals with it for you to that you can spend your time making your site more awesome.

[subscribe_cta]